Way1: Undelete Voicemail on iPhone from "Deleted Messages" Folder
If you recently deleted some voicemail messages, these are usually moved to the deleted folder. To recover the messages, follow the simple steps below:
Step 1: In your Phone App, open the Voicemail application.
Step 2: Scroll down until you find the “Deleted Messages” tab and tap on it.
Step 3: Select the Voicemail messages you would like to undelete.
Step 4: At the bottom left of your screen, you will see an Undelete button. Tap on it.
Step 5: You can repeat the above steps to undelete all the messages you want to recover.

On tapping the Undelete button, the message will be recovered automatically. You will find it in the Voicemail section.
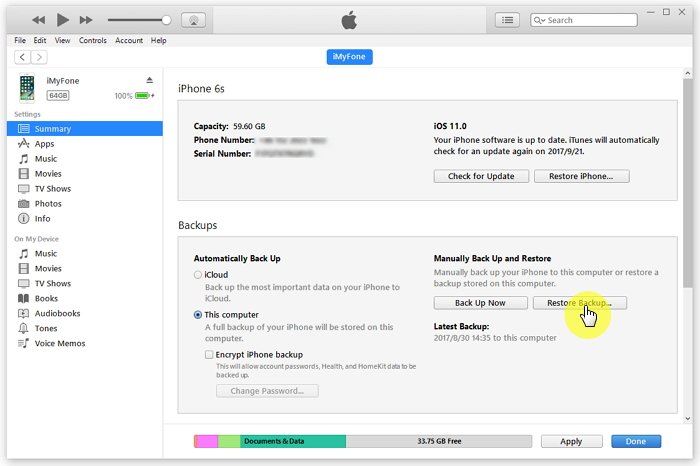
Way 2: Undelete Voicemail on iPhone from iTunes Backup
If you have already backed up your iPhone on iTunes, you have the ability to restore everything back to your iPhone including your deleted Voicemails. To do this, follow the simple steps indicated below:
Step 1: Use the PC or Mac you used to back up your iPhone to open iTunes.
Step 2: Use a USB cable to connect your iPhone to your computer. If you are asked to Trust This Computer or for a passcode, simply follow onscreen steps that appears.
Step 3: Your iPhone should appear on iTunes. Select it.
Step 4: Look for Restore Backup and select it in iTunes.
Step 5: Pick the relevant backup you want to restore. In this case, the Voicemail messages.
Step 6: Click on Restore. If a password is requested, enter it. Wait for the restore to complete.
Step 7: Ensure that your device is connected even after it restarts. Wait for the iPhone to sync with the computer. After the sync is finished, you can disconnect it.
Way 3: Undelete Voicemail on iPhone from iCloud Backup
If you have previously used iCloud to back up your iPhone, you can get your deleted Voicemails back. The following steps should help you achieve this:
Step 1: Turn your iPhone on. What you should see is a Hello screen. If your iPhone is already set up, you need to erase its content before proceeding.
Step 2: Follow the steps on your device's screen until you reach the App & Data section. Select the option for restoring data from iCloud.
Step 3: Use an Apple ID you own to sign in to your iCloud account.
Step 4: Choose the backup you want to restore. For this case, choose voicemail. After choosing, the transfer should start. If you are informed that a newer iOS version is required, update the iPhone by following the onscreen steps.
Step 5: If you have used multiple Apple IDs to purchase iTunes and App Store content you might be asked to sign in to each. You can Skip this Step. You will have an option of signing in later.
Step 6: Stay Connected and wait for the progress bar to appear and complete. This can take some few minutes to a whole hour depending on the network speed and your backup size. Disconnecting will pause the progress until when you reconnect.

Way 4: What If You Won’t Be Able to Undelete Voicemail via Phone App
In some cases, you may find you don’t have the ability to undelete Voicemail messages on your iPhone using all the methods we have described above. However, this doesn’t mean all is lost. You can try using desktop programs.
A good desktop program to use is the dr.fone - Recover (iOS). This is a reliable software that allows you to recover all your deleted voicemails. It will provide you with a gallery that includes both deleted and current voicemails. You can restore the voicemails by simply selecting the ones that you need.
It is important to note that if you want to recover your lost data, you should stop using your iPhone immediately after you lose your data. This is because any new data written into the device may overwrite the data you lost and hence render it unrecoverable.
Another alternative iPhone data recovery software that you can try is the free trial version of Gihosoft iPhone Data Recovery is a professional iPhone Data Recovery software to get back all your lost text message, photo, video, call history, note, contact and more from iPhone/iPad/iPod Touch. It offers a full solution to recover your lost data in different tough situations. Besides recovering data directly from iPhone, iPad and iPod touch, it also allows you to recover data from iCloud and iTunes backup files.
Although this software does not support the recovery of voicemail on iPhone for now, it works well for other iPhone data. You will get to recover text messages, WhatsApp, WeChat, Viber, Contacts, QQ, Call Logs, and more. A free trial is available for you to use if you have this kind of need.
Tip: How to Deal with Common iPhone Voicemail Issues
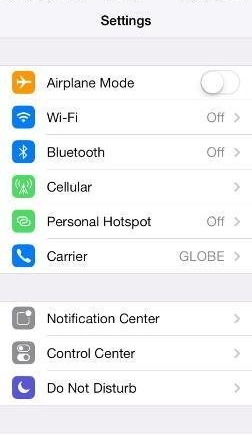
Check Signal
To access Voicemail, you need to have an active cellular data network connection. It is not possible to access voicemail over Wi-Fi. To check signal, follow the steps below:
Step 1: Tap Settings > Wi-Fi. Turn the Wi-Fi off.
Step 2: Check your iPhone’s top-left corner to ensure that you have a strong signal.
Step 3: If Airplane Mode is on, turn it off. Tap Settings > Airplane Mode.
Step 4: Test the cellular data network connection by using Safari to open a web page.
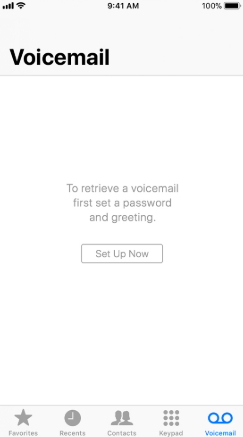
Verify Setup
For you to receive any Visual Voicemail messages, voicemail has to be set up on your iPhone. To set up Visual Voicemail, tap on Phone > Voicemail and follow the onscreen prompts. If the device happens to dial your voicemail instead, listen to the prompts to set up.
Conclusion
If you delete important Voicemail messages on your iPhone, you still can get them back. The methods we have outlined in this article will help you undelete them on your iPhone. Although all the methods may not work for everyone, you are destined to find something that works. Try each method and move on to the next if the previous one doesn’t work. We love comments, therefore, feel free to leave yours below.
No comments:
Post a Comment