6/30/2018

How to View and Delete Your Google Assistant History


It’s rather creepy when you dig into it. Google claims this helps its services work better over time by better anticipating your needs, but do you really want Google having a complete record of everything? The good thing is you can review your Google Assistant history and delete what you’ve queried. Here’s a look at how to find and delete all the interaction you’ve had with Google Assistant.
REVIEW AND DELETE GOOGLE ASSISTANT HISTORY


The best way to review your Google activity is from a computer. Just open a browser and head to the Google Voice and Audio Activity Page. There you will see everything you’ve use Google Assistant for. This includes all interactions you’ve had with it on your phone or via a Gogole Home speaker. You can scroll through and see everything and play it back if you want.


You can delete an individual recording by clicking the ellipsis in the section with the recording and choose Delete.


Or, you can delete all voice activity for a certain day by clicking the ellipsis icon on the data banner and choose Delete. A verification will come up letting you know the data can’t be recovered – which is a good thing – and hit delete to get rid of the full days’ worth of voice activity.


If you want to get rid of all voice and audio activity in one fell swoop, from the same page, click “Delete activity by” in the right panel. From the menu choose “All time” and Voice & Audio. Click Delete and verify you want to get rid of it.


You can also delete your Google Assistant history from your phone. Open the Google Home app and tap the hamburger menu and then My Activity. On the next screen, you’ll see the same activity as you would from the website.


Now, keep in mind everything you say is recorded and saved. So, if you use Google Assistant a lot for email dictations, you’re going to find a lot of recordings and playing them back is unsettling, to say the least. The other concerning privacy issue to point out is, all of the other voices and audio playing in the background, while talking to Google Assistant, is captured as well. You will hear what’s playing on your radio or TV or even what other people are talking about in the background.


Sponsor Ads:
Gihosoft Free iPhone Data Recovery is a professional iPhone Data Recovery software to get back all your lost text message, photo, video, call history, note, contact and more from iPhone/iPad/iPod Touch.
Gihosoft Android data recovery Free is a super awesome software specialized in Android file recovery. With this program, you are able to recover deleted photos, music, videos, messages, contacts, call logs, WhatsApp messages, Viber chat history and more from Samsung, Huawei, LG, HTC, Motorola, Google, Oneplus, Sony, Lenovo, ZTE and other Android devices directly. Meanwhile, this Android data recovery software is available for both Windows and Mac platforms.

How to Customize Group Notifications in iOS 12


How to Customize Group Notifications in iOS 12


Now this feature is a huge improvement over what we’ve seen before but it’s not quite there yet. I’ve been using it for the past couple of weeks and I’ve seen multiple notification stacks coming from the same app or the same conversation. If you use WhatsApp or Facebook Messenger a lot, these can still pile up.


There’s a way to force this feature to only show one stack for an app. This would significantly reduce your notification clutter. Only thing is that you need to do it on a per-app basis.Gihosoft iPhone Data Recovery is a professional iPhone Data Recovery software to get back all your lost text message, photo, video, call history, note, contact and more from iPhone/iPad/iPod Touch.


Step 1: From Settings, go to Notifications.


Step 2: Select an app.Also Read:Windows Media Player Won’t Play AVI Troubleshooting


Step 3: Swipe all the way down and tap on Notification Grouping and select By App.


Now all the notifications from the app will show up as a single stack. Go and do this for all the apps which send you a lot of notifications. If for some reason you don’t want an app to group its notifications, you can turn off the Notification Grouping for an app as well.Sponsor ads:
Gihosoft iPhone Data Recovery Free
Free iPhone Data Recovery Software for Windows/Mac
Recover up to 12+ types of files, including contacts, SMS, photos, WhatsApp, Viber, notes, etc.
Restore lost data from iOS devices directly or from iTunes and iCloud backup
Recover iPhone data lost due to iOS upgrade/jailbreak, accidental deletion, device lost or broken
Support all the latest iPhone, iPad and iPod Touch
Both Free and Pro version.
If you lost data after you updated to a new iPhone, you can always use Gihosoft iPhone Data Recovery to get the data back from the old iPhone or backup.You may also like: iphonerecovery.com
If you use android phones, please choose Gihosoft Android Data Recovery.
With Gihosoft Android Data Recovery, no longer afraid of data loss!
Gihosoft RePicvid Free Photo Recovery Software provides a free photo recovery software for windows to help users recover the deleted or lost photo for free.
Jihosoft Android Data Recovery: the best Android Data Recovery software for Windows and Mac to recover deleted contacts, messages, photos, videos, WhatsApp and etc from Android devices.

6/25/2018

Apple seeds iOS 11.4.1 beta 4 for developer


Apple releases iOS 11.4.1 Beta 4 to registered Developers for iPhone and iPad.


iOS 11.4.1 beta 4 contains security with bug fixes and improvements with just around 60 MB of size with a build number 15G5074a.


Downloading iOS 11.4.1 beta 4


The registered developer can download the iOS 11.4.1 beta 4 from the Apple Developer Program with an appropriate configuration profile or Apple Beta Software Program through OTA (Over the Air) by navigating Settings >> Software Update >> Download and Install.


Along with that Apple also releases fourth betas of macOS 10.13.6 and tvOS 11.4.1.


Image Credit: Apple
Sponsor Ads:
Gihosoft iPhone Data Recovery is a professional iPhone Data Recovery software to get back all your lost text message, photo, video, call history, note, contact and more from iPhone/iPad/iPod Touch. It offers a full solution to recover your lost data in different tough situations. Besides recovering data directly from iPhone, iPad and iPod touch, it also allows you to recover data from iCloud and iTunes backup files.


6/24/2018

How to Undelete Voicemail on iPhone (2018)


Way1: Undelete Voicemail on iPhone from "Deleted Messages" Folder


If you recently deleted some voicemail messages, these are usually moved to the deleted folder. To recover the messages, follow the simple steps below:


Step 1: In your Phone App, open the Voicemail application.


Step 2: Scroll down until you find the “Deleted Messages” tab and tap on it.


Step 3: Select the Voicemail messages you would like to undelete.


Step 4: At the bottom left of your screen, you will see an Undelete button. Tap on it.


Step 5: You can repeat the above steps to undelete all the messages you want to recover.


On tapping the Undelete button, the message will be recovered automatically. You will find it in the Voicemail section.
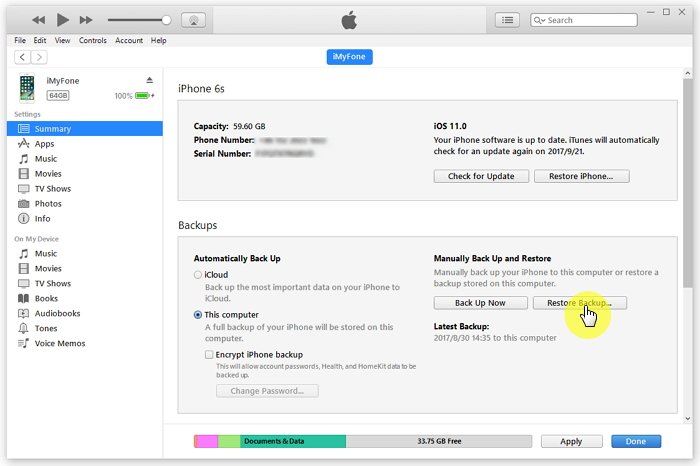
Way 2: Undelete Voicemail on iPhone from iTunes Backup


If you have already backed up your iPhone on iTunes, you have the ability to restore everything back to your iPhone including your deleted Voicemails. To do this, follow the simple steps indicated below:


Step 1: Use the PC or Mac you used to back up your iPhone to open iTunes.


Step 2: Use a USB cable to connect your iPhone to your computer. If you are asked to Trust This Computer or for a passcode, simply follow onscreen steps that appears.


Step 3: Your iPhone should appear on iTunes. Select it.


Step 4: Look for Restore Backup and select it in iTunes.


Step 5: Pick the relevant backup you want to restore. In this case, the Voicemail messages.


Step 6: Click on Restore. If a password is requested, enter it. Wait for the restore to complete.


Step 7: Ensure that your device is connected even after it restarts. Wait for the iPhone to sync with the computer. After the sync is finished, you can disconnect it.


Way 3: Undelete Voicemail on iPhone from iCloud Backup


If you have previously used iCloud to back up your iPhone, you can get your deleted Voicemails back. The following steps should help you achieve this:


Step 1: Turn your iPhone on. What you should see is a Hello screen. If your iPhone is already set up, you need to erase its content before proceeding.


Step 2: Follow the steps on your device's screen until you reach the App & Data section. Select the option for restoring data from iCloud.


Step 3: Use an Apple ID you own to sign in to your iCloud account.


Step 4: Choose the backup you want to restore. For this case, choose voicemail. After choosing, the transfer should start. If you are informed that a newer iOS version is required, update the iPhone by following the onscreen steps.


Step 5: If you have used multiple Apple IDs to purchase iTunes and App Store content you might be asked to sign in to each. You can Skip this Step. You will have an option of signing in later.


Step 6: Stay Connected and wait for the progress bar to appear and complete. This can take some few minutes to a whole hour depending on the network speed and your backup size. Disconnecting will pause the progress until when you reconnect.


Way 4: What If You Won’t Be Able to Undelete Voicemail via Phone App


In some cases, you may find you don’t have the ability to undelete Voicemail messages on your iPhone using all the methods we have described above. However, this doesn’t mean all is lost. You can try using desktop programs.


A good desktop program to use is the dr.fone - Recover (iOS). This is a reliable software that allows you to recover all your deleted voicemails. It will provide you with a gallery that includes both deleted and current voicemails. You can restore the voicemails by simply selecting the ones that you need.


It is important to note that if you want to recover your lost data, you should stop using your iPhone immediately after you lose your data. This is because any new data written into the device may overwrite the data you lost and hence render it unrecoverable.


Another alternative iPhone data recovery software that you can try is the free trial version of Gihosoft iPhone Data Recovery is a professional iPhone Data Recovery software to get back all your lost text message, photo, video, call history, note, contact and more from iPhone/iPad/iPod Touch. It offers a full solution to recover your lost data in different tough situations. Besides recovering data directly from iPhone, iPad and iPod touch, it also allows you to recover data from iCloud and iTunes backup files.


Although this software does not support the recovery of voicemail on iPhone for now, it works well for other iPhone data. You will get to recover text messages, WhatsApp, WeChat, Viber, Contacts, QQ, Call Logs, and more. A free trial is available for you to use if you have this kind of need.
Tip: How to Deal with Common iPhone Voicemail Issues
Check Signal


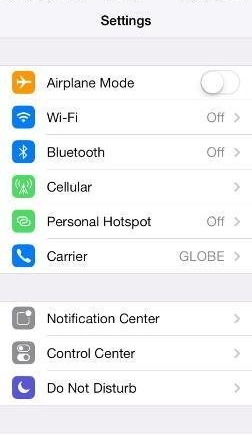
To access Voicemail, you need to have an active cellular data network connection. It is not possible to access voicemail over Wi-Fi. To check signal, follow the steps below:


Step 1: Tap Settings > Wi-Fi. Turn the Wi-Fi off.


Step 2: Check your iPhone’s top-left corner to ensure that you have a strong signal.


Step 3: If Airplane Mode is on, turn it off. Tap Settings > Airplane Mode.


Step 4: Test the cellular data network connection by using Safari to open a web page.


Verify Setup


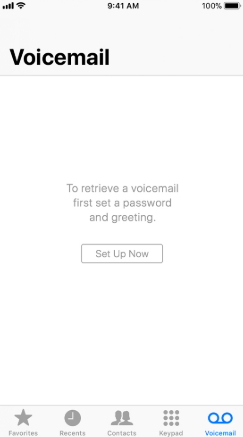
For you to receive any Visual Voicemail messages, voicemail has to be set up on your iPhone. To set up Visual Voicemail, tap on Phone > Voicemail and follow the onscreen prompts. If the device happens to dial your voicemail instead, listen to the prompts to set up.


Conclusion


If you delete important Voicemail messages on your iPhone, you still can get them back. The methods we have outlined in this article will help you undelete them on your iPhone. Although all the methods may not work for everyone, you are destined to find something that works. Try each method and move on to the next if the previous one doesn’t work. We love comments, therefore, feel free to leave yours below.

6/23/2018

A hacker bypasses iPhone passcodes on iOS 11 or later


A hacker bypasses iPhone passcodes on iOS 11 or later


According to ZDNet Matthew Hickey, a security specialist, and a hacker has discovered a method to brute force the iPhone or iPad passcode running iOS 11 or later.


In the earlier iOS version, all iOS devices have a encryption and have a functionality of four or six-digit passcode protection which was impossible to break or unlock iPhone or iPad without a passcode.


And if the wrong passcode is entered too many times, the device gets a locked out and have to wait until the time frame which then needs to restore it to the factory setting.


Now security researcher and co-founder of cybersecurity firm Hacker House have found a way to bypass wrong passcode limit on iOS 11 or later and has posted on Vimeo.


Hickey found a way around that. He explained that when an iPhone or iPad is plugged in and a would-be-hacker sends keyboard inputs, it triggers an interrupt request, which takes priority over anything else on the device.


Apple needs to fix this hack, that is why Apple is rolling out a new feature called USB Restricted Mode in its upcoming iOS 12 update making more difficult to bypass.


For more details see here
Gihosoft iPhone Data Recovery is a professional iPhone Data Recovery software to get back all your lost text message, photo, video, call history, note, contact and more from iPhone/iPad/iPod Touch. It offers a full solution to recover your lost data in different tough situations. Besides recovering data directly from iPhone, iPad and iPod touch, it also allows you to recover data from iCloud and iTunes backup files.

6/19/2018

Download iOS 11.4.1 Beta 3 without developer account


WHAT’S NEW IN IOS 11.4.1 BETA 3?


iOS 11.4.1 Beta 3 has a build number of 15G5072a and is already out for 43 devices. This version comes just one week after the release of the second beta of iOS 11.4.1.


Along with a beta for iOS, Apple also seeded tvOS 11.4.1 Beta 3 to developers.


This version is aimed mainly at fixing bugs and introducing performance improvements. Users have reported no new features thus far.
Sponsor ads:
Jihosoft  iPhone Data Recovery


Users, however, did report standby issues on several iPad models in beta 2. Hopefully, this update will fix process management in idle state.


If you want to move to the latest beta, just grab and install the OTA Profile given below for a hands-free update.


For those of you want to go the iTunes route, download and save the necessary IPSW file locally on your computer (Windows or Mac).
IOS 11.4.1 BETA 3 DOWNLOAD
IPHONE


iPhone SE, iPhone 5s


iPhone 6s, iPhone 6


iPhone 6s Plus, iPhone 6 Plus


iPhone 8, iPhone 7


iPhone 8 Plus, iPhone 7 Plus


iPhone X
IPAD


iPad mini 4, iPad Air 2, iPad mini 3


iPad (9.7-inch)


iPad Pro (9.7‑inch)


iPad Pro (12.9‑inch)


iPad Pro (10.5-inch), iPad Pro (12.9-inch) (2nd generation)
IPOD


iPod touch (6th generation)
OTA PROFILE


Download
SHOULD YOU UPDATE?


I wouldn’t recommend upgrading your device just now considering this version brings next to nothing to the table.


iOS 11.4.1 Beta 2 is already quite stable for a beta version so you should probably stay where you are.


Apple will probably seed the second beta of iOS 12 tomorrow or sometime during the next week. If you are a “beta enthusiast”, waiting a week or two will surely pay off in the end.


Sponsor Ads:


Gihosoft iPhone Data Recovery is a professional iPhone Data Recovery software to get back all your lost text message, photo, video, call history, note, contact and more from iPhone/iPad/iPod Touch. It offers a full solution to recover your lost data in different tough situations. Besides recovering data directly from iPhone, iPad and iPod touch, it also allows you to recover data from iCloud and iTunes backup files.

6/17/2018

How to Use Find My iPhone & Locate The Lost iPhone

How to Set up Find My iPhone on Your iPhone/iPad


Before you learn how to use Find My iPhone software, you should get it properly set up on your iPhone or iPad device.
How to Set up Find My iPhone on Your iPhone/iPad


Go to the settings menu of your device and tap your iCloud account listed under your name. However, if you are using an older version (iOS 10.2 or earlier), you can go to Settings and select iCloud straightaway.


You will be able to see the Find My iPhone app under the iCloud, then just tap it.


Then, sign in with your Apple ID and password.


Now, you will need to switch on the options called “Find My iPhone” and “Send Last Location”.


Tip: The other Apple devices such as Apple Watch and AirPod that are paired to your iPhone or iPad, will be configured automatically at the completion of the above setup.
How to Use Find My iPhone to Locate The Lost iPhone
With An iOS Device


1. Get hold onto another iOS device.


2. Tap on the Find My iPhone app located in the Apps.


3. Enter your device’s Apple ID and password.


4. On the screen, you will be able to notice a compass. In addition to that, you can see the term “Locating”. It means that the tracking process is started. A couple of notifications will appear; these notifications will let you allow Find My iPhone app to turn on the option called “Send Last Location”.


5. You will be directed to a map by now. This map will show the locations of all the devices you own.


6. Identify your lost device and zoom in.


7. After locating your iPhone, you have a couple of options to consider.


Play a sound if you are really close to the device.


Switch it into “Lost Mode” and make it send its location.


If you cannot accomplish any of the above, go to Erase iPhone (so your data will not be misused by a third party).


8. After selecting the appropriate option, sign out from Find my iPhone.


With iCloud.com


Use a web browser and type in www.iCloud.com.


Enter the credentials to log into your iCloud account.


Go to Find iPhone (which is located in the main menu).


You will be required to enter Apple ID and password to sign in.


Select “All Devices” and go to the device you need to locate.


Now, you can zoom in the map and locate your device closely. Now can simply choose an option from the upper right corner.


Play a sound (if the device is left on silent mode and it is somewhere in the house, this can be useful).


Lost mode (you can enter a contact number which will be displayed on the screen of the lost device together with a notification sound).


Erase mode (if you are unable to get your device back, erase all the data).


What If Find My iPhone Isn’t Working
Common reasons that Find My iPhone may not work


After a successful configuration of Find My iPhone app, your iOS device may not show up due to three reasons.


The device’s battery is dead or it is switched off


The device doesn’t have access to internet


The device’s Location Service is turned off
Available Options When Find My iPhone Doesn’t Work


Enable “Notify Me When Found” option to let the Find My iPhone app notify you as soon as it is connected to internet.Gihosoft iPhone Data Recovery is a professional iPhone Data Recovery software to get back all your lost text message, photo, video, call history, note, contact and more from iPhone/iPad/iPod Touch. It offers a full solution to recover your lost data in different tough situations. Besides recovering data directly from iPhone, iPad and iPod touch, it also allows you to recover data from iCloud and iTunes backup files.
Select any of three options (Play Sound, Lost Mode or Erase); the selected option will get activated as soon as the device is connected to internet.Sponsor ads: Jihosoft  iPhone Data Recovery


Select “Remove from Account” (if you have purposely got rid of the device and you don’t need to track it any more).

6/16/2018

How to Exit iPhone Apple Logo Loop


1. Force Restart iPhone to Fix iPhone Apple Logo Loop


Force restarting your iPhone is a quick and efficient way to resolve several iOS related issues including iPhone Apple logo loop. Depending upon the various iPhone models, we have shown the different steps to perform force restart on your iPhone.


iPhone 6 or older models


Press the 'Home' button along with the 'Power' button and keep them holding until you get to see Apple logo on your screen.


iPhone 7/7 Plus


Push the 'Power' button along with the 'Volume Down' button and keep holding both of them till you see Apple logo on your screen.


iPhone 8/8 Plus/X


Briefly push the 'Volume Up' button and then 'Volume Down' button. Lastly, push the 'Power' button and keep it holding till you get to see Apple logo on your screen.


There are some people who find iPhone stuck on apple logo of death issue is resolved once they have done force restarting. In case it is still not resolved, jump to the next solution then. Sponsor ads:
Jihosoft  iPhone Data Recovery


Gihosoft iPhone Data Recovery is a professional iPhone Data Recovery software to get back all your lost text message, photo, video, call history, note, contact and more from iPhone/iPad/iPod Touch. It offers a full solution to recover your lost data in different tough situations. Besides recovering data directly from iPhone, iPad and iPod touch, it also allows you to recover data from iCloud and iTunes backup files.
Set iPhone into Recovery Mode & Restore It from a Backup (Data Lost)


One of the ways to get your device out of the Apple Logo loop is to put it in recovery mode and then restore it form an iTunes backup. There are high chances that you device's firmware may have been glitched due to any recent malfunction, which is why your iPhone's stuck on Apple logo of death. This solution works very well although it may result in data loss.


First of all, you need to put your iPhone into Recovery mode and restore it using iTunes. After restoring your iPhone to a new one, you can choose to restore an iTunes backup to your iPhone. Some of the data on your device that you had not backup to you computer via iTunes will be lost if you use this method.


Here's how to fix iPhone Apple logo loop using iTunes:


Step 1: Connect your iPhone to the computer and open iTunes.


Step 2: You need to follow the aforementioned force reboot steps according to your device model but this time keep holding the buttons till you see the connect to iTunes screen on your iPhone. If this is not clear for you, learn how to do it.


Step 3: The iPhone will now be in recovery mode and iTunes will confirm it. You will be asked to restore this iPhone. Click "OK" and then "Restore iPhone..." to begin the restore process..


Step 4: When the restoring process finishes, your iPhone will be like a new one. This is when you can set it from a recent backup. Just click "Restore Backup" and then choose a backup you want to restore back to your iPhone.


6/15/2018

How to use Animoji and Memoji in FaceTime video calls on iPhone X


How to use Animoji and Memoji in FaceTime video calls on iPhone X


You can use them in your group and a one-on-one video call. Before you start, make sure you have already created a Memoji on your iPhone X. You have not done it yet? No problem, head to this quick guide to make it a fantastic one. Since there are many customization options, you would like to create a custom avatar.


Step # 1. Launch FaceTime app on your iPhone and start a call.


Step # 2. Now press Rectangular Inlay on the lower left of the screen → Then tap Animoji Icon


Step # 3. Then you have access to all your created Memojis and still hilarious Animojis. Select the avatar that you want to use. Now your face will be replaced by the Animoji / Memoji. Discover how perfectly he follows the movements of your face.Sponsor ads:
Jihosoft  iPhone Data Recovery


Hint: Gihosoft iPhone Data Recovery is a professional iPhone Data Recovery software to get back all your lost text message, photo, video, call history, note, contact and more from iPhone/iPad/iPod Touch. It offers a full solution to recover your lost data in different tough situations. Besides recovering data directly from iPhone, iPad and iPod touch, it also allows you to recover data from iCloud and iTunes backup files.

Ways to Fix “iTunes Has Stopped Working” Windows 7


Ways to Fix “iTunes Has Stopped Working” Windows 7


The following solutions are second to the TunesFix, but they can still be used to solve this type of iTunes error.
1. Start iTunes in Safe Mode


There are two know ways you can run an application on Windows 7 PC, the first one is by double-clicking the application, while the second is by running the program in safe mode. Safe mode simply means isolating iTunes software from every interference that can be caused by plugins or third-party scripts.


Step 1: Hold down the Shift + Ctrl keys instantaneously, and then double-click on iTunes icon.Sponsor ads:

Jihosoft iPhone Data Recovery:https://www.jihosoft.com/recovery/ios-data-recovery.html

Jihosoft iPhone Data Recovery


Step 2: A notification with the instruction “iTunes is running in safe mode” will appear. Click “Continue” tab to start iTunes in safe mode.


2. Remove Third-Party Plug-ins, Add-ons, and Scripts


Third party add-ons, plug-ins and scripts that were not developed by Apple Inc. can interfere with the performance of iTunes software on Windows 7/8/10 PC. You can remove third-party plug-ins, add-ons, and scripts from iTunes by following these steps.


Step 1: Hold down the Windows key on your Keyboard and press “E” to open File Explorer or Windows Explorer.


Step 2: Click ‘This PC” or “My Computer”.


Step 3: Navigate to the following locations: C:\Users\username\App Data\Roaming\Apple Computer\iTunes\iTunes Plug-ins and C:\Program Files\iTunes\Plug-ins.


Step 4: Move the plug-ins to a different location like a desktop.


Step 5: Run iTunes again.


3. Uninstall and Re-install iTunes and Its Related Software Components


Sometimes, working only on iTunes in the face of “iTunes stopped working” Windows 7 error is not very successful. It’s good to search for solutions beyond iTunes and include its software components. Uninstalling and reinstalling these iTunes software components would help to solve the problem.


Step 1: Hold down the Window key on the Keyboard and press “R”.


Step 2: Type “appwiz.cpl” and press the Enter key to open “Program and Features”.


Step 3: Navigate to iTunes, right click on it, and then choose “Uninstall”.


Sponsor Ads:


Gihosoft iPhone Data Recovery is a professional iPhone Data Recovery software to get back all your lost text message, photo, video, call history, note, contact and more from iPhone/iPad/iPod Touch. It offers a full solution to recover your lost data in different tough situations. Besides recovering data directly from iPhone, iPad and iPod touch, it also allows you to recover data from iCloud and iTunes backup files.


Step 4: Repeat step 3 for the following programs:


iTunes


Apple Software Update


Apple Mobile Device Support


Bonjour


Apple Application Support 32-bit


Apple Application Support 64-bit


Step 5: Restart your PC.


Step 6: Launch your browser, go to Apple website, download and install iTunes.


Step 7: Test iTunes on your Windows 7/8/10 PC.

6/13/2018

How to Clean Up iTunes Library?

Manual Solution to Clean up iTunes Library

If you want to clean up your iTunes library manually, then you should use the method provided by iTunes itself. iTunes has built-in features to help you clean up the library quite easily. Follow these instructions:
Step 1: Launch iTunes on your Mac or Windows PC.
Step 2: Navigate to File > Show Duplicate Items via the menu bar of iTunes. A list of all the duplicate items will appear.
clean duplicates
Step 3: From the list of duplicate items, select the songs that you wish to delete and then erase them to clean up your iTunes library. Alternatively, there is also an option to get rid of all the duplicates at once. You can use that option to save time and effort.

3. Other Tips to Clean Up iTunes Library

Following are some other tips to clean up iTunes library:

a. Update Your Album Artwork

iTunes automatically recognizes your albums and updates their artwork. But if for some reason it doesn’t, then you should select the individual songs and then navigate to Advanced > Get Album Artwork option and the album artwork will be updated. If a song has the wrong artwork, then right-click on that song and select Clear Downloaded Artwork option to clear it and then download it again.

b. Keep a Good Habit

Cleaning up the iTunes library is a task that should be repeated from time to time. If you keep it well-organized, then you will be able to manage your songs, podcasts, audiobooks, TV shows, movies, etc. easily and properly. Once your iTunes library is neat and organized, you should make a habit of keeping it that way.
Here are two tips to keep it in mind:
  • Whenever you import new tracks into your iTunes library via File > Add to library option, delete the original tracks that iTunes copies from your computer’s hard drive.
  • When you import a new album into your iTunes library, make sure that album contains all the metadata you would like it to, instead of letting unedited songs pile up.
Do you like this story?
Sponsor Ads:
Gihosoft TubeGet:https://www.gihosoft.com/free-youtube-downloader.html Easy to Download 4K/8K Videos from YouTube on Windows & Mac!

6/10/2018

How To Get Portrait Lightning Mode Feature On Any iPhone

One of the major feature of iPhone X and iPhone 8 Plus is “Portrait Lightning Feature” on Camera app that allow users to take Natural, Studio, Contour, Stage Light, or Stage Light Mono photos. If you are buying these expensive smartphone just to get this feature, stop it now!


In this post, we will show you one mind blowing app “Phocus” that adds portrait lightning feature on older iPhone like iPhone 5s, iPhone SE, iPhone 6, iPhone 6 Plus, iPhone 6s, iPhone 6s Plus, iPhone 7, iPhone 7 Plus, and iPhone 8.

You won’t actually believe this but this app works. Download “Phocus” from Appstore and you will be able to take great portrait lightning photos even with your older iPhone. So why buy iPhone X?

Phocus for iPhone and iPad has 5 different modes that you can edit. Portrait: that creates background blur, Studio: brings you to the foreground with your own colors, Mono: get very cool black and white photos which is similar to stage light mono on iPhone X and 8 Plus. The great thing is it automatically detects the foreground and applies effect instantly.
Gihosoft iPhone Data Recovery Free:https://www.gihosoft.com/iphone-data-recovery-free.html

You can also apply splash and fade effects to your photos that helps to get cool photos with gray scale background.

Really, Phocus has the power to add iPhone X Portrait Lightning Feature to any iPhone!

The app has over 1.4k reviews with 4.6 rating. Phocus is available to download on Appstore for $3.99!
Gihosoft iPhone Data Recovery is a completely free yet powerful data recovery software to retrieve deleted or lost data from iPhone, iPad and iPod touch.


6/08/2018

watchOS 5 brings Wi-Fi menu How to connect WiFi on Apple Watch

With a continuous flow of new features aside watchOS 5, Apple added a new WiFi menu in the Settings that lets you manually connect your Apple Watch to nearby Wi-Fi networks.

There was no such option in the previous version of watchOS. You can join only with known WiFi networks to the iPhone that is paired with.

watchOS 5 Compatibility

New watchOS 5 is compatible with Apple Watch Series 3, 2, and 1 with iPhone 5s or higher up to iPhone X running iOS 12 or later. watchOS 5 now no longer supports the first-generation Apple Watch (Series 0).

Connecting a Wi-Fi network on Apple Watch

Follow some easy steps to connect to a Wi-Fi network manually on Apple Watch:

1. Make sure you have installed the watchOS 5 on your Apple Watch.

2. Now open the Settings app on your Apple Watch.

3. Tap the Wi-Fi and toggle on the switch to green to enable it.

4. Apple Watch will begin searching for the nearby Wi-Fi networks, simply choose your SSID (WiFi name) you’d like to connect to.

5. Enter the WiFi password with Apple Watch Scribble feature if it is password protected and tap on Join.

Picture Credit via Reddit
Gihosoft iPhone Data Recovery is a professional iPhone Data Recovery software to get back all your lost text message, photo, video, call history, note, contact and more from iPhone/iPad/iPod Touch. It offers a full solution to recover your lost data in different tough situations. Besides recovering data directly from iPhone, iPad and iPod touch, it also allows you to recover data from iCloud and iTunes backup files. What's more, it supports Smart Recovery modes that can find your iPhone data quickly.

iOS 12 Brings Live Listen feature to AirPods that serves as a hearing aid

Apple will bring Live Listen hearing aids feature to the AirPods wireless headphones via iOS 12, making it easier for deaf users to use the iPhone as a directional microphone and have AirPods to relay audio. (Via TechCrunch)

Back in 2014, Apple introduced the Live Listen feature, designed to pair iPhones with hearing aids, and then enabling the iPhone as a remote microphone and then transfer audio to hearing aids.

How does it work?

For example, with the feature, users can place the iPhone on a table in a noisy environment such as a restaurant. Then, the iPhone can transmit the voice of the opposite person to the user’s ears with AirPods, which it becomes a Hearing aide.

Although AirPods with Live Listen cannot replace traditional hearing aids, it should be a big help, especially in an emergency circumstance.


Image Via The Mac Observer
Do you like this story?
Sponsor Ads:

Gihosoft iPhone Data Recovery is a professional iPhone Data Recovery software to get back all your lost text message, photo, video, call history, note, contact and more from iPhone/iPad/iPod Touch. It offers a full solution to recover your lost data in different tough situations. Besides recovering data directly from iPhone, iPad and iPod touch, it also allows you to recover data from iCloud and iTunes backup files.

Live Listen Feature can be accessed through Control Center. So first let’s add this feature in to Control Center:
  • Settings
  • Control Center
  • Customize Controls
  • Tap (+) on Hearing
  • Now Access Control Center by swiping up from the bottom of the screen and you will see an icon with an Ear
How to Use Live Listen Feature in iOS 12
  • Pair and put on your Airpods in to your Ear
  • Access Control Center
  • Tap the Hearing Sign
  • Tap On & Done
  • You will eventually start hearing sounds that’s happening around you
How to Turn Off or Disable Live Listen Feature in iOS 12
  • Access Control Center
  • Tap the Hearing Sign again
  • Tap Off & Done
For more controls, you can assign Accessibility Shortcut which will then allow you to access Live Listen by triple pressing the Home Button. Here is how to Enable:


Remember, the sound you hear on Airpod is forwarded from the iPhones mic. Therefore, the more you place your iPhone near to the object where the sound is coming from, the louder and clearer you hear on Airpods.

Featured Post

iOS 12 group Facetime, Supports upto 32 people simultaneously

Apple introduces a group facetime in iOS 12 that supports video call up to 32 people at the same time along with the LIVE Memoji. It’s ...