7/16/2018

How to Make MacBook Air/Pro/iMac Run Faster after High Sierra Update 2019 Guide?


How to Make MacBook Air/Pro/iMac Run Faster after High Sierra Update 2019 Guide?


How to Speed Up MacBook Pro/Air/iMac after High Sierra Update?


With the uncontrolled hype of the macOS High Sierra update that around its better data management, video streaming, and gameplay graphics, it is little wonder some Macs are slowing down to accommodate such functionalities. Various issues have been linked to slow performances in Macs, such as full hard drive, system aging or the presence of too many applications running simultaneously. Although this Mac becoming sluggish after High Sierra upgrade problem’s specific cause might be unknown, its fixes have been identified and some of our trusted fixes are listed below:
1 Clean Hard Drive on Your MacBook


Unlike the human brain that constantly automatically deletes old and unnecessary data or files, the Mac never deletes a file because it is unnecessary and/or old. File deletion can only be initiated by the user. The flaw of this design is that over time, the limited space hard drive becomes congested and even filled up if nothing is ever deleted. This can be a dangerous scenario for a computer as it hampers performance and could lead to damage, hence frequent decongestion is advised.


Decongestion can be achieved via two methods, either manually or automatically. Manually, a user can go through the rigorous process of searching for and identifying all redundant files and documents on his device and deleting them manually. This is very time and energy consuming but can help in addressing the Mac slowing down after High Sierra update issue.


Automatically, users can opt for tools such as the CleanMyMac 3 tool that automatically identifies redundant files, hidden or not and deletes them, thereby freeing up space on your hard drive for improved Mac functionality and performance.
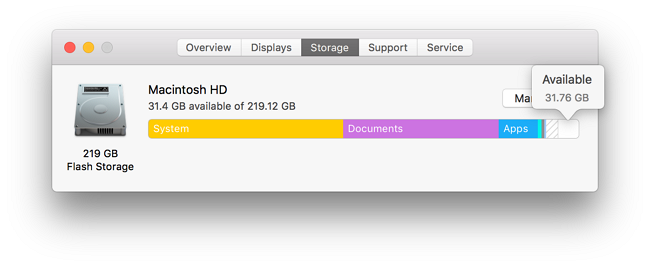


2 Activate the Optimize Storage Option on Your Mac


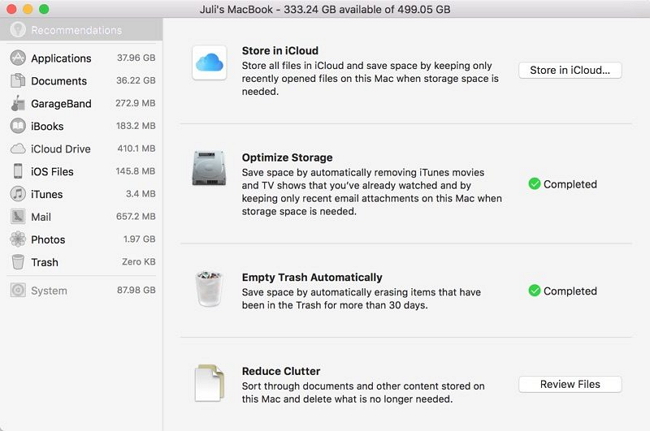
This Optimize Storage feature is one of the subtle yet amazing features Macs sport that other PC’s have in no wise deployed effectively if at all. Optimized storage is an option that permits mac to arrange and organize files optimally and automatically. To access this setting follow Apple Menu > About this Mac > Storage > Optimized Storage.


Once this option is toggled On, it enforces Mac to automatically organize files and documents while also cleaning unused, hidden or unread items on your device. It moves them to the iCloud, freeing up valuable space on your drive. Before executing this move to the cloud, it requests permission to clear memory, cache, log etc. which should be granted for it to be effective.


3 Decongest Your Mac Memory and CPU Space


A major reason your Mac might be running slow after its High Sierra update might be that numerous applications are running simultaneously thus consuming vital CPU space thereby slowing down the system. While some applications run actively, others run in the background and also consume considerable space. To recover memory space and resolve this issue, deploy the Activity Monitor.


Access Applications > Utilities > Activity Monitor


Under the CPU tab, you would see the distribution of CPU usage among the currently running processes. Should you identify an application that is not necessary but is consuming considerable memory space, be swift to eliminate it by tapping it and hitting the close button at the top-left corner of the screen. The Memory tab at the top region of the Activity Monitor should be opened to reveal the Memory distribution among the opened apps. Unwanted apps can also be toggled off to save Memory.


4 Reconfigure SMC & PRAM/NVRAM


The System Management Controller (SMC) and parameter RAM (PRAM) are important tools in ensuring the smooth functioning of the Mac. Reconfiguring the SMC resolves all hardware management issues like fans or battery faults, etc. while reconfiguring the NVRAM handles issues pertaining to booting, screen resolutions and battery charge etc.


SMC on Mac Mini, iMac, Mac Pro & Xserve reconfiguration


Power down your Mac and disconnect the cord


Leave the system for 15 seconds minimum then reconnect the power cord


After a 5 seconds wait, Power up the Mac normally


SMC on MacBook Pro, MacBook Air & MacBook reconfiguration


Power down your Mac and disconnect the cord


Leave the system for 15 seconds minimum then reconnect the power cord


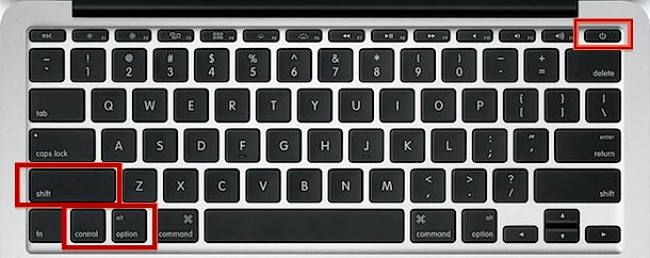
Long Press Shift + Option + Control + Power button for 10 seconds minimum, Power up Mac normally after releasing all keys If you accidentally deleted or lost videos on iPhone, first please check on the Recently Deleted folder. Alternatively, you can use the professional tool Gihosoft iPhone Recovery to recover deleted iPhone videos from Camera Roll or some apps.


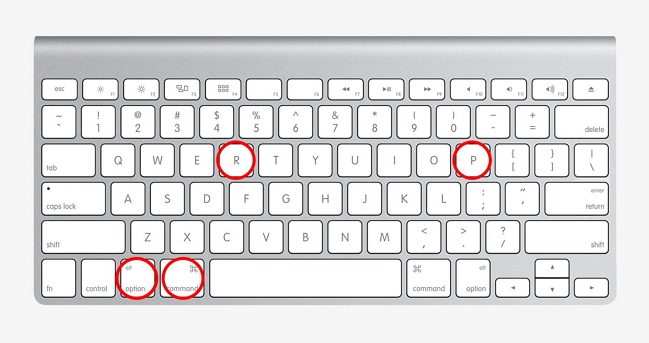
PRAM/NVRAM reconfiguration on all Macs


Power down the Mac, wait for some seconds


Power up and simultaneously press Cmd + P + R + Option


Release keys after hearing the restarting beep


The mac running slow after High Sierra update is a widespread problem facing many users using different Mac models, however, the above basic hacks and fixes would help your Mac run smoothly in no time.


Interview with tweak developer Squ1dd13


Q1. HOW AND WHEN DID YOU GET STARTED WITH TWEAK DEVELOPMENT?

A. I started early last year, after getting annoyed by the fact that I could only do to my device what developers made for my device.
I decided, given that I have always been into computing, that I would try my hand at some Objective C (the language in which tweaks are written in).
ios development
When I started, I really struggled to get into it, but after a while of hard work, I learned Objective C quite well and really started challenging myself with bigger tweaks.

Q2. YOU ONLY RELEASE FREE TWEAKS. IS THERE ANY SPECIFIC REASON BEHIND THAT?

A. I only release free tweaks because I do not have the money to purchase tweaks myself.
From time to time, from small donations, I will purchase a paid tweak. However, I only get those donations because I am a developer.
Glacier
The people who install the tweaks are mostly not, and I think it would be unfair to rule out some people by charging for tweaks.

Q3. ARE YOU CURRENTLY WORKING ON ANY NEW PROJECT (MAY OR MAY NOT BE IOS-RELATED) OR A JAILBREAK TWEAK?

A. At the moment, I am working on a tweak called Quotifications.
This is a tweak that gets quotes from the internet and replaces the “No Recent Notifications” text with a random one. I am getting through it well, and am currently testing it.
Expect a public beta soon!

Q4. HAVE YOU EVER FELT THAT TWEAK DEVELOPERS DESERVE MORE MONEY FOR DEVELOPING TWEAKS?

A. I think that it depends on the tweaks you make. A developer who dedicates weeks and weeks to write a tweak and works incredibly hard on it should get paid for his work, definitely.
Although sometimes I see tweaks and think: “Should that really cost money?”. Sometimes developers go for the wrong decision between free and paid.
If you accidentally deleted or lost videos on iPhone, first please check on the Recently Deleted folder. Alternatively, you can use the professional tool Gihosoft iPhone Recovery to recover deleted iPhone videos from Camera Roll or some apps.

7/15/2018

How to fix Stuck On “iTunes Is Downloading the Software for This iPhone”?


1. iTunes Is Downloading the Software for This iPhone? How Long Does It Take?

Actually there is no particular time limit on how long it will take for iTunes to download the firmware. It varies from people to people, depending on how soon your iDevice connects with the Apple server to download the software. Roughly 'iOS Download and Update' usually takes almost 30 minutes. If everything goes fine then your device might run smoothly in no more than 1 hour.
If you find iTunes is stuck on "iTunes Is Downloading the Software for This iPhone" for hours, you may quit iTunes and restart to try again.

2. If Your iPhone Is in Normal Mode Before That

If your iPhone works normally before iTunes is stuck on downloading the software for this iPhone, you can try do something for both your iTunes and iPhone to avoid the problem.
Here in this section, we've brought to you quite effective solutions that you can perform to fix the iTunes stuck issue.

2.1. Update iTunes

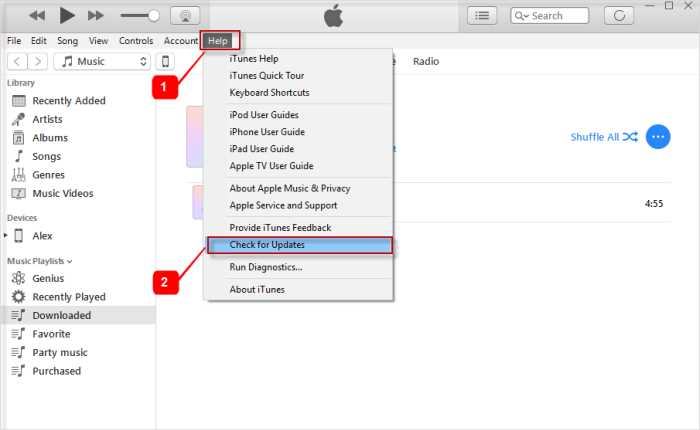
First of all, make sure you have the latest iTunes installed. To update iTunes on Windows version, you can just click "Help" in the Menu, and then click "Check for Updates". Follow the instruction to install the latest version of your iTunes.
update iTunes
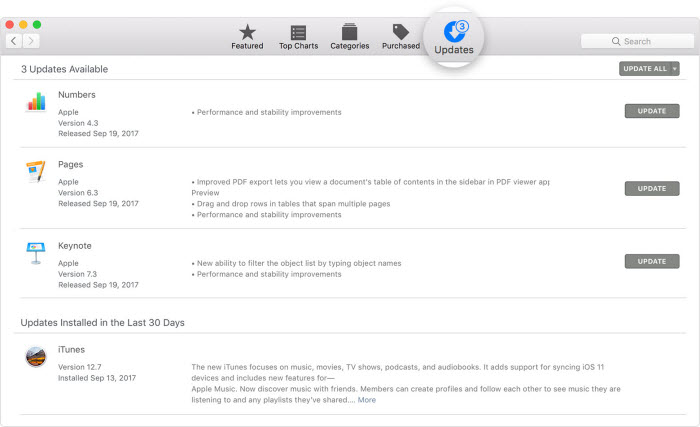
If you are using a Mac, you can just go the the App store and check if there is update for iTunes. Click "UPDATE" if there is the option.
update iTunes on Mac

2.2. Hard Reset iPhone

Try performing hard reset on your iPhone as the first method to fix the issue as it has been proved effective for fixing iOS glitches. Follow the steps provided carefully:
  • iPhone 6 or Older Devices
Hold down the 'Sleep/Wake' button simultaneously with 'Home' button till you see the phone screen turn black. As soon as the Apple logo starts appearing, let go of the buttons.
  • iPhone 7/7 Plus
Press and hole the 'Sleep/Wake' and 'Volume Down' button together until the Apple logo appears. Leave them once after that.
  • iPhone 8/8 Plus/iPhone X
First quickly push the 'Volume Up' key and release quickly, repeat the same with the 'Volume Down' key. Press the 'Sleep/Wake' button till the Apple logo appears on the screen.

2.3. Reset all Settings

To reset all settings in your iPhone, you don't have to be a tech-geek. Knowing some simple steps will ease your burden and help you deal with the problem that iTunes is stuck on downloading the software for this iPhone. Here are the steps –
  1. From your iPhone home screen, go to 'Settings' and then click 'General'.
  2. Scroll down to the end of the screen and then press the 'Reset' tab found there.
  3. Under 'Reset' option click on 'Reset All Settings' and you are good to go. If prompted for a passcode then provide the same.
reset all settings

2.4. Restore from Backup

If you are still stuck on "iTunes is downloading the software for this iPhone", you should then try to resolve it by restoring your device from a previous backup. Sometimes, restoring with old backup fixes whatever additional glitches happened with an iOS device. So, here are the steps to do it –
  1. Ensure to install the latest version of iTunes on your computer and launch it. Connect your iPhone using a lightning cable and make sure to tap on 'Trust' when 'Trust This Computer' message appears on your screen. Now, click on your iPhone from the iTunes' main screen.
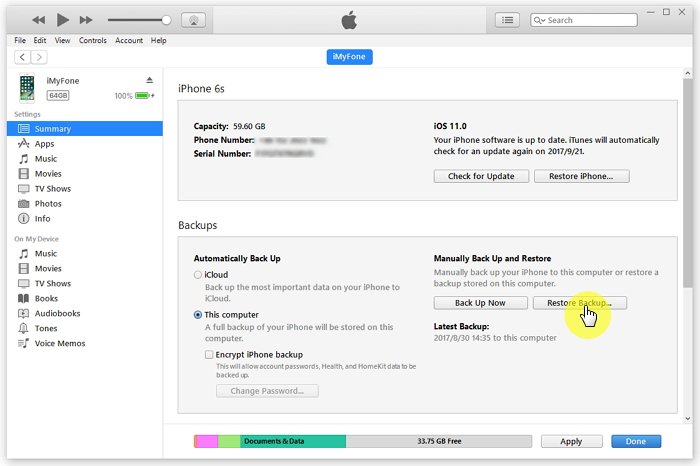
  2. Go to the 'Summary' tab and under the 'Backups' section click on 'Restore Backup' button. Select the most recent or any desired backup file from the list in the pop-up window and tap 'Restore'.
Note: Please do not disconnect the iDevice until the process completes.
restore iTunes from backup
Gihosoft Free iPhone Data Recovery is a professional iPhone Data Recovery software to get back all your lost text message, photo, video, call history, note, contact and more from iPhone/iPad/iPod Touch.

7/14/2018

How to Backup Music from iPhone to iTunes

How to Backup Music from iPhone to iTunes


Use iTunes to Backup Music

If you change your iPhone or have unfortunately lost or damaged it, iTunes backup can help restore your lost data like music, camera roll, settings, accounts and documents on your new device. This means even if you have had the worst day and lost your precious iPhone, you can still take comfort in the thought that iTunes got your back and your backup!
Steps to Backup Music from iPhone to iTunes


On your PC or Mac, open iTunes.


Using a USB cable, connect your iPhone. Follow the on-screen steps, like use a passcode and “trust this computer”.


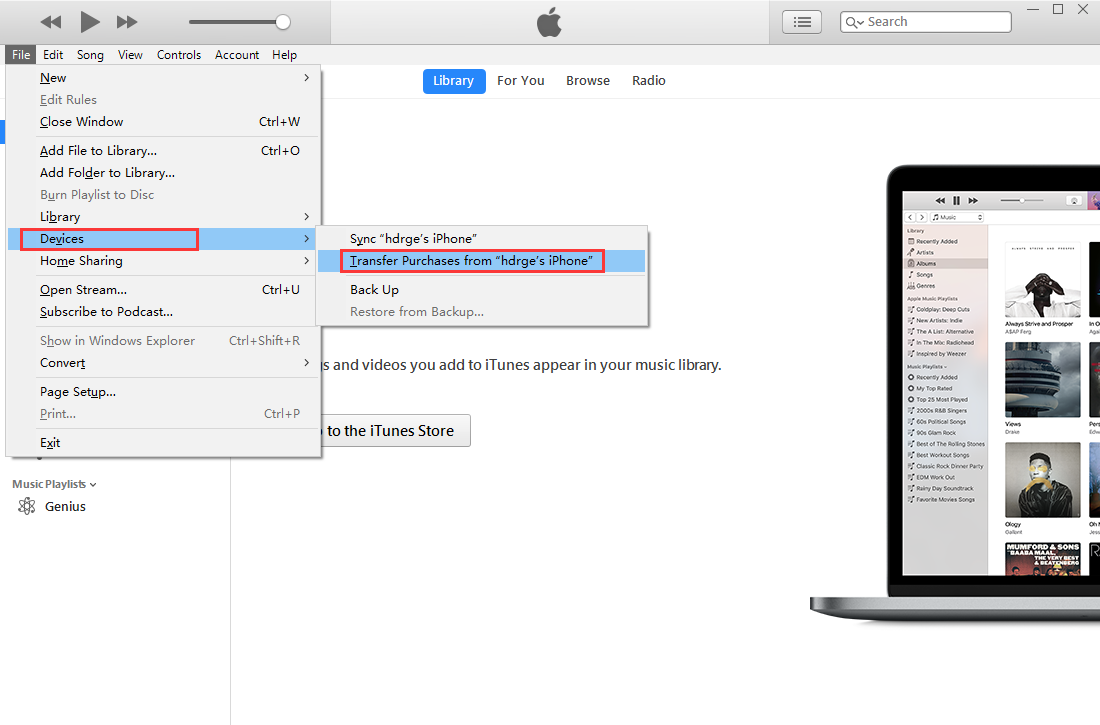
Click “File”. It's in the upper-left side of the iTunes window (Windows) or the top menu bar of the screen (Mac).


Select “Devices”. This option is near the bottom of the File drop-down menu.


Click “Transfer Purchases from [Name]”. Instead of "[Name]", you'll see your iPhone's name here. Clicking this option prompts the music to begin transferring onto your computer.

Sponsor ads:ISO Mounter Free Software for Creating Virtual CD Drive

Also Read:Download the Latest Version of Samsung Kies for PC and Mac OS


Wait for the purchased music to finish transferring. Depending on the amount of music that you need to transfer, this may take a few seconds to a few minutes.If you accidentally deleted or lost videos on iPhone, first please check on the Recently Deleted folder. Alternatively, you can use the professional tool Gihosoft iPhone Recovery to recover deleted iPhone videos from Camera Roll or some apps.


Although iTunes is great for backup, it has some limitations. For example it doesn’t support a lot of media formats because of which various music files or other audio/video files have to be converted for them to work properly.

My iPad Won’t Connect to WiFi?

1. Restart Your Router and Make Sure You Are Within Range

Before you start thinking that the problem is about the device, you need make sure the router is working correctly. One of the ways you can do that is to restart the router. It is possible that the router is unable to transmit over the 2.4 GHz or 5 GHz frequency block. To restart it, look for the red button on the router and press it. Wait about 2 minutes after restarting the router, then you can try to connect again.
Another reason your iPad could be failing to connect to Wi-Fi is that your device may be out of range. If the device is far from the router, change your location to see if the connection can improve.

2. Reset Your iPad Network Settings

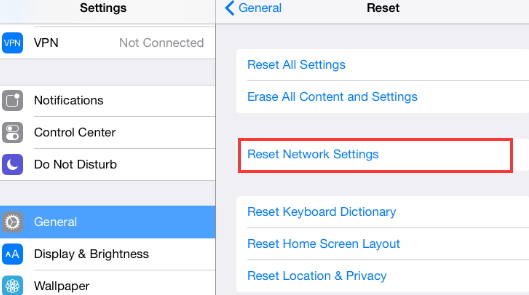
If you are certain that the problem is not due to the router, you may need to reset the iPad’s network settings. To do that, follow these very simple steps:
  1. Open the settings on your iPad and then tap on “General”.
  2. Tap on “Reset” and then click on “Reset Network Settings”.
  3. Now rejoin the network and then try connecting to it again.
reset-ipad-network-settings

3. Update The Router’s Firmware

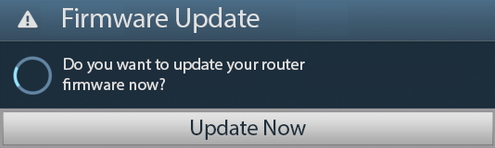
If you have verified that your router is working correctly and you have reset the network setting on your iPad but still can’t connect, you may need to ensure that the router has the latest firmware installed on it.
To update the firmware on your router, you need to check the device manually since different manufacturers will have different methods to do it. You should also check the manufacturer’s website for the instructions.
router-firmware-update

4. Reset Your iPad’s Wi-Fi Connection

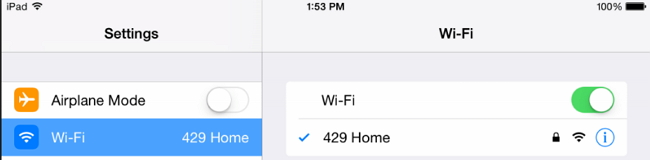
Resetting your iPad’s Wi-Fi connection may also help to fix the problem if you are still unable to connect to it. The following simple steps will help you reset your iPad WiFi connection:
  1. Go to Settings and then tap on Wi-Fi.
  2. Slide the button to OFF to turn off Wi-Fi.
  3. Wait a few seconds and then switch it on again.
  4. Now check to see if you can connect to Wi-Fi.
reset-ipad-wifi-connection

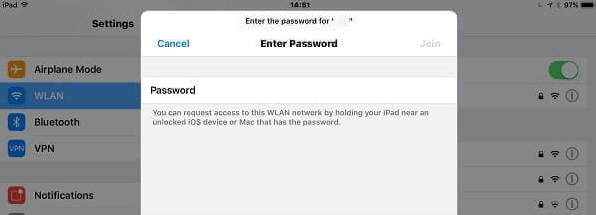
5. Check & Reenter Your Wi-Fi Password

If you are unable to connect to Wi-Fi after joining a network, it is possible that you may enter the wrong password. Passwords can be difficult to remember especially when they have a combination of numbers and letters. Check to ensure that you are entering the correct password.
enter-wifi-password

6. Forget The Network and Rejoin

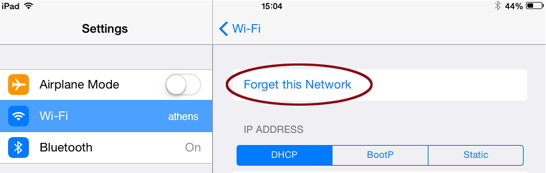
It is also possible that sometimes a software bug can interfere with the connection between your iPad and the router. In this case, you need to forget a network and then rejoin. If you suspect that this connection may have been tampered with in some way, follow these simple steps to forget and rejoin a network:
  1. Open the Settings app on your iPad.
  2. Tap on “Wi-Fi”.
  3. Next to the Network you’d like to forget, tap on the information button.
  4. Tap “Forget this Network” at the top of the screen.
  5. After a while, the network will reappear in the main Wi-Fi list. Select it and log in if you need to.
forget-wifi-network-ipad
You can then open a web page in Safari to check if the network is working correctly.

7. Turn Airplane Mode on/off

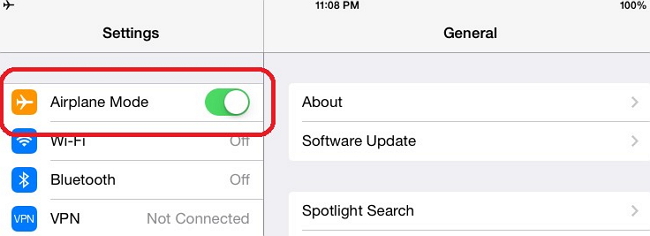
Toggling Airplane mode on and off has also been known to work for network related problems. Try it to fix this Wi-Fi problem.Gihosoft iPhone Data Recovery Free:https://www.gihosoft.com/iphone-data-recovery-free.html

  1. Open the Settings app on your iPad.
  2. Turn on Airplane Mode.
  3. Wait a few seconds and then turn off Airplane Mode again.
turn-on-off-ipad-airplane-mode

8. Force Restart Your iPad

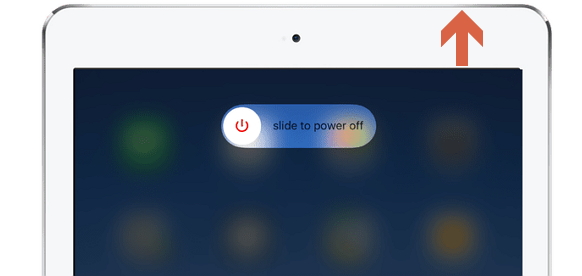
If all the above troubleshooting options have not worked to fix your troublesome Wi-Fi connection, you can force restart the iPad to see if refreshing the entire device can help. Follow these simple steps to force restart your iPad:If you accidentally deleted or lost videos on iPhone, first please check on the Recently Deleted folder. Alternatively, you can use the professional tool Gihosoft iPhone Recovery to recover deleted iPhone videos from Camera Roll or some apps.

  1. Press and hold the top or side button on your device until you see the slider on the screen.
  2. Drag the slider to turn off the device completely.
  3. Then simply press and hold the top or side button until the device turns on again and you see the Apple Logo.
restart-ipad

9. Update iPad to The Latest iOS Version

A device that is running a version of iOS that is not up to date may fail to work as expected including being unable to connect to a Wi-Fi network. This is why it is a good idea to update the iPad to the latest version. To do that, plug in the device into a power source and then follow these simple steps:
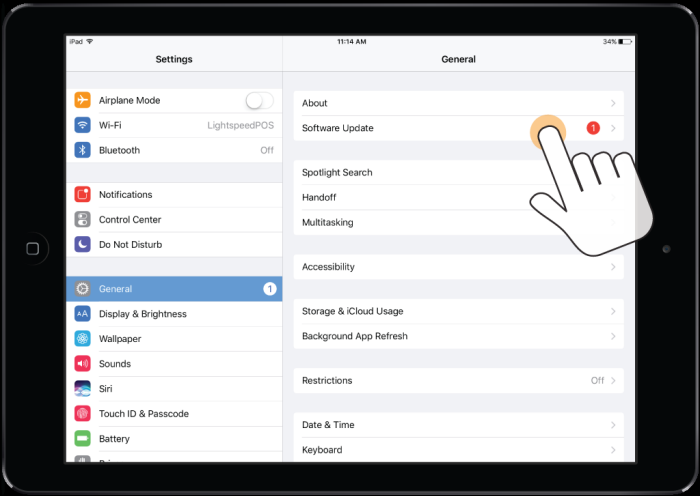
  1. Tap on Settings > General > Software Update.
  2. If an update is available, tap “Download and Install”. If you see a message saying you need to temporarily remove some apps since iOS needs more space, tap “Continue” or Cancel”. Any removed apps will be reinstalled once the update is complete.
  3. Tap “Install” and wait for the update to be installed on your device.
iPad-Software-update

10. Custom DNS on Your iPad

You can also try to change the Custom DNS setting if the problem persists. Here’s how to do that:
  1. Go to settings on your iPad and then tap on Wi-Fi.
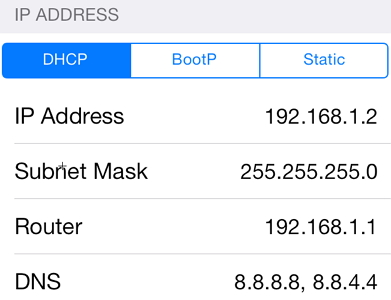
  2. Click information button next to the network you’re trying to connect to and change the DNS to 8.8.8.8 or another secure DNS.
custom-dns-ipad

7/13/2018

Emus4u Package Installer for iOS Emulators


Here’s a list of emulators that are currently available on this installer.


GBA4iOS


NDS4iOS


iNDS


HappyChick


PPSSPP


Delta


Apart from emulators, it also has a few streaming and social media apps such as Instagram Red. Here’s how you can install it on your iPhone, iPad, and iPod touch.
COMPATIBILITY
IOS 9


9.0.1


9.0.2


9.1


9.2


9.2.1


9.3


9.3.1


9.3.2


9.3.3


9.3.4
IOS 10


10


10.0.2


10.0.3


10.1


10.1.1


10.2


10.2.1


10.3


10.3.1


10.3.2


10.3.3
IOS 11


iOS 11.0.1


iOS 11.0.2


iOS 11.1
REQUIREMENTS


iPhone, iPad, and iPod touch


A compatible firmware version


Internet connection
HOW TO DOWNLOAD AND INSTALL EMUS4U ON IOS


Step 1 Open Safari web browser.


Step 2 Open this URL – iinstaller.net


Step 3 Tap the “Install onto your iDevice” button to start the installation process. Remember, it is supported by in-app advertisements.


Step 4 It will now prompt you to install the profile. Tap Allow.


Step 5 Tap Install and once the profile is in place, tap Done. If you accidentally deleted or lost videos on iPhone, first please check on the Recently Deleted folder. Alternatively, you can use the professional tool Gihosoft iPhone Recovery to recover deleted iPhone videos from Camera Roll or some apps.


Best iPhone X Jailbreak Tweaks on Cydia for iOS 11.3.1 2018


In this article, we have compiled the best iPhone X jailbreak tweaks on Cydia that are compatible with iOS 11.3.1 – iOS 11.2.
Best iPhone X Jailbreak Tweaks on Cydia for iOS 11.3.1

Check out the video by our Friend Miguel (iDeviceHelp) to see the best iPhone X jailbreak tweaks for iOS 11.3.1 in action:
DateUnderTimeX

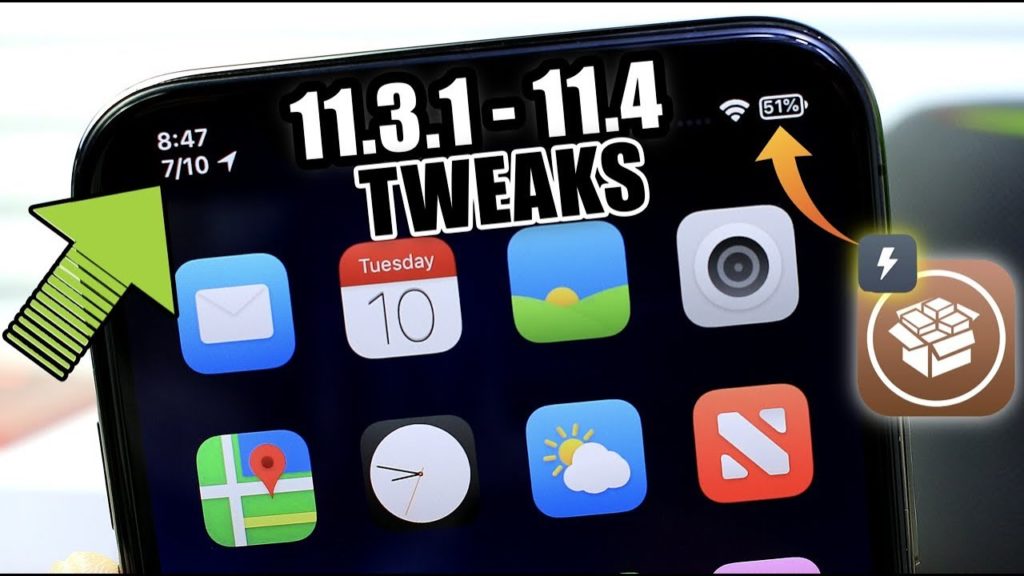
Thanks to the iPhone X notch, there isn’t much space available in the Status bar but as the name suggests, the jailbreak tweak adds the date below the time in the status bar.
DoubleTapLock

You can tap on the Lock screen to wake iPhone X. The doubleTapLock tweak, does the opposite. It allows you to double tap on the Home screen to lock your iPhone X.If you accidentally deleted or lost videos on iPhone, first please check on the Recently Deleted folder. Alternatively, you can use the professional tool Gihosoft iPhone Recovery to recover deleted iPhone videos from Camera Roll or some apps.


easySwitcherX

On iPhone X, you need to tap and hold on the app card and swipe up to force close the apps, which is not very convenient. easySwitcherX makes it much easier as you can simply swipe up on the app card to force kill the app.
PercentageBatteryX

To check the battery percentage of iPhone X, you need to swipe down from the top-right part of the screen – the right ear next to the notch to access the Control Center.

Apple doesn’t provide a way to enable battery percentage in the Settings app. PercentageBatteryX replaces the battery indicator with the battery percentage in the Status bar itself so you don’t need to swipe down to check the battery percentage on your iPhone X.

Featured Post

iOS 12 group Facetime, Supports upto 32 people simultaneously

Apple introduces a group facetime in iOS 12 that supports video call up to 32 people at the same time along with the LIVE Memoji. It’s ...