3/17/2023

4 ways to connect your Phone/iPhone to the TV

 As the traditional family entertainment tool, television plays an important role to make family more harmonious. However, with the advent of the smart time, we found more and more TV shows require fees, we have to pay additional charges for our favorite.
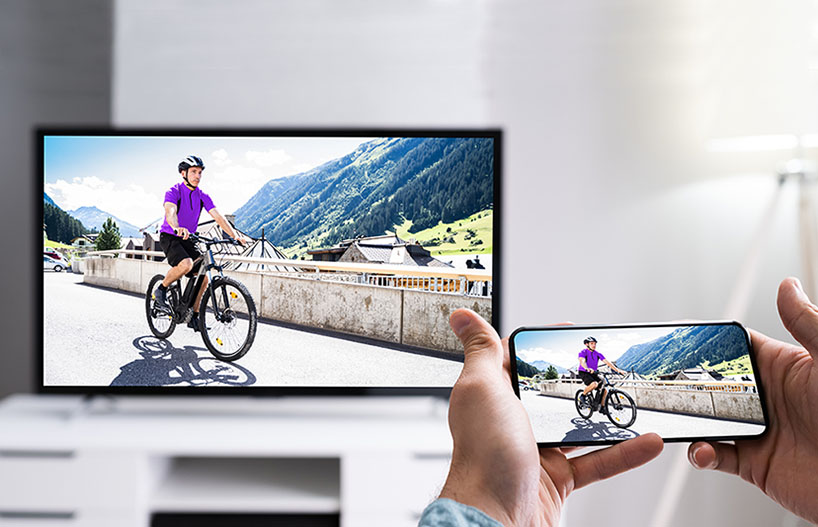


The benefits of watching TV by connecting a smartphone


There are many free video resources in the smartphone, a variety of movie Apps dazzle us, if we are able to connect our phones to the television, we will save ourselves a nice stack of cash. Besides, we can also enjoy the videos from our phones like download videos and shooting videos and more.


Make sure your phone is able to connect the TV


Not each phone or television support this way, as it must meet two basic conditions to make your phone connect to the TV successfully.


a) The both connect devices must be the smart device


If you still use the traditional handset and television, you can't connect the handset to the television. To make it work, you need a smart phone/tablet and smart TV.


b) It requires the network


When you connect your phone to the TV by wirelessly, it requires a network. The network is the medium of data transmission. Without the network, the television can't share the data from your phone.


To connect your Android smartphone or iPhone to the TV, below are the several normal ways for trying.


4 ways to connect an Android phone/tablet/iPhone to the smart TV


1. Use the smartphone's built-in screen-cast function(Wireless)


This is the most convenient way to connect to your TV wirelessly. Nowadays, many smartphones and smart TVs support Miracast function. So you can do follow the steps:

  • Connect both cell phone and TV to the same Wi-Fi. Make sure the Wi-Fi is ok.
  • Find the 'My Applications' option on your TV, find Miracast software icon. Open Miracast.
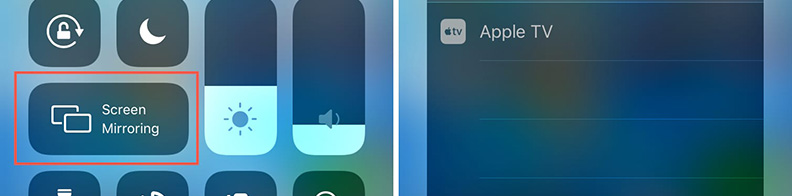
  • Find the screen-cast icon(as the picture show below) in the notification bar on your cell phone(iPhone named it screen mirroring). Tap it. The phone will start to detect devices automatically, for a while, you will see the detected devices list.

  • * Android phone screen mirroring icon


    * iPhone screen mirroring icon


  • Find your TV name in the list, and connect it. (The connecting process will take about 10 s to 1 minute)
  • Finished.


  • 2. Use the player Apps(Wireless)


    Another convenient way to connect to your TV without data cable. There are many player Apps integrated screen-cast function in the market, thus, we can enjoy fun of multiscreen interactive via the App. The disadvantage is you can only watch the videos from the App.

    The steps are:

  • Connect both cell phone/iPhone and TV to the same Wi-Fi. Make sure the Wi-Fi is ok.
  • Find the 'My Applications' option on your TV, find Miracast software icon. Open Miracast.
  • Open the movie player App on your phone, find screen-cast button, tap it. The App will start to scan the nearby devices. Choose your TV name/model in the list, to connect.
  • Finished.


  • Lectura de contenido relacionado:Corrige 0x0 0x0 Error

    Leer másG2a sitio


    3. Use the Type-C + HDMI convert cable(not USB cable)
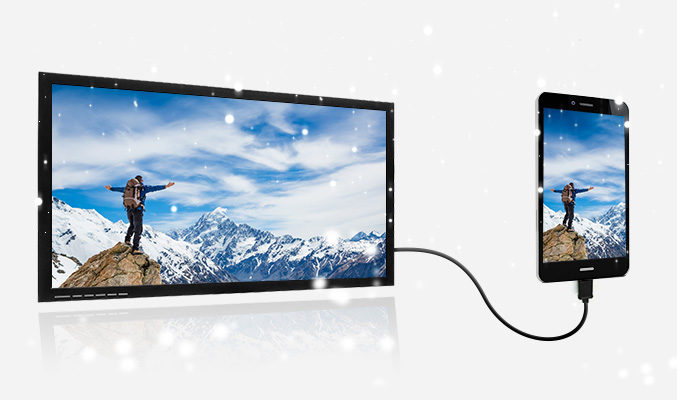

    This is a convenient wired connect way without set-top box. Only need a convert cable(it looks like a USB cable) - one side is HDMI jack, another side is Type-C jack.
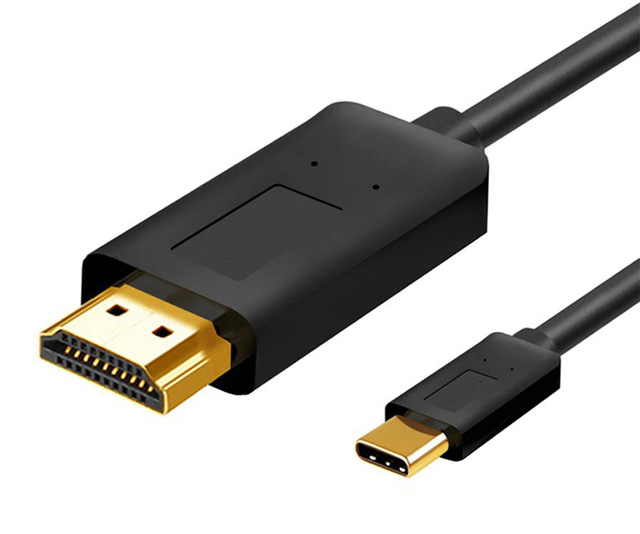
    * Type-C + HDMI convert cable


    Steps are below:

  • Connect your TV's HDMI port via HDMI jack.
  • Connect your phone's Type-C port via Type-C jack.
  • Select the match signal source(HDMI) on your TV.
  • Finished.


  • 4. Video software with screen-cast function(Wireless)


    Some video Apps, like video-make Apps or video-recording Apps and more, come with Miracast function. They are not only able to cast pictures and videos, but also able to share screen in real time.

    The steps are:

  • Connect both cell phone/iPhone and TV to the same Wi-Fi. Make sure the Wi-Fi is ok.
  • Find the 'My Applications' option on your TV, find Miracast software icon. Open Miracast.
  • Open the video App on your phone, find screen-cast button, tap it to detect the nearby devices. Choose your TV name/model to connect.
  • Finished.


  • 9/10/2019

    Download iOS 13 and iPadOS 13 Golden Master


    Apple today released the Golden Master build of iOS 13 and iPadOS 13 to developers along with the third beta of iOS 13.1/iPadOS 13.1. The Golden Master build drops a few weeks after Apple had released iOS 13 beta 8 to developers. After that, the company started releasing beta builds of iOS 13.1 and iPadOS 13.1 instead of iOS 13/iPadOS 13 to developers.

    The Golden Master build of iOS 13 and iPadOS 13 are likely going to be the final public build of the OSes which is released by Apple next week. That is unless the company comes across a major bug and is forced to fix it before the public release.

    Compared to the last beta build, iOS 13 and iPadOS 13 Golden Master will be a lot more stable in nature and have fewer bugs.

    Alongside iOS 13 and iPadOS 13 Golden Master, Apple also released the third developer beta of iOS 13.1 and iPadOS 13.1 to developers.
    Download iOS 13 and iPadOS 13 Golden Master

    If you are already running iOS 13 Developer Beta 7 on your iPhone, you just need to go to Settings -> General -> Software Update and download the beta 8 OTA. The same steps are also applicable for downloading iPadOS 13 Beta 8.

    A new public beta build of iOS 13 and iPadOS 13 should also drop later today.
    iOS 13 Features

    iOS 13 and iPadOS 13 come with a number of new features and are the biggest updates to the OSes in a few years. Some of the major new features in iOS 13/iPadOS 13 include a Download manager in Safari, Dark mode, updated system apps, and more.

    1. Dark Mode

    A system-wide Dark mode is probably the highlight of iOS 13. It stretches from the Lock screen to the widgets screen to Apple’s own apps. Even the keyboard gets a better version of the dark mode. Dark mode can be enabled easily from the Control Center.


    2. New Reminders App

    There is a new smarter and enhanced Reminders app in iOS 13. It uses Natural Language Processing which makes it easier to add reminders and tasks.

    Read: iOS 13 Reminders App Hands-On

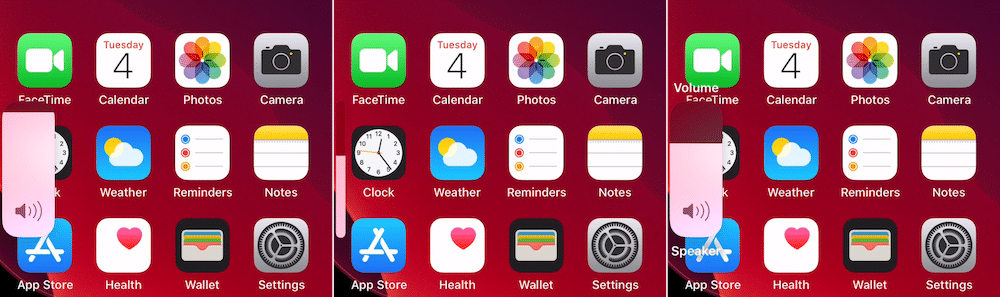
    3. Redesigned Volume HUD

    The new Volume HUD appears in the top-left corner of the screen in an unintrusive manner. It first shows up as a full-sized slide. But it immediately shrinks and becomes unintrusive.


    4. Improved Safari

    Safari has received a major update in iOS 13 and iPadOS 13. It now features a dedicated Download manager which means one can now use the browser to download files.

    On iPadOS 13, Safari will now load the desktop version of websites to offer a better browsing experience.Also Read:h33t proxy


    5. QuickPath

    The stock keyboard in iOS 13 has finally gained gesture-based typing known as QuickPath. This is similar to the swipe-based typing experience offered by SwiftKey and Gboard.

    ➤ You can read more about all the new features in iOS 13 here.

    Do drop a comment and let us know if you have found any major changes in iOS 13/iPadOS 13 Golden Master build compared to the previous beta builds.

    8/13/2019

    How to Use AR Walking Directions on iPhone


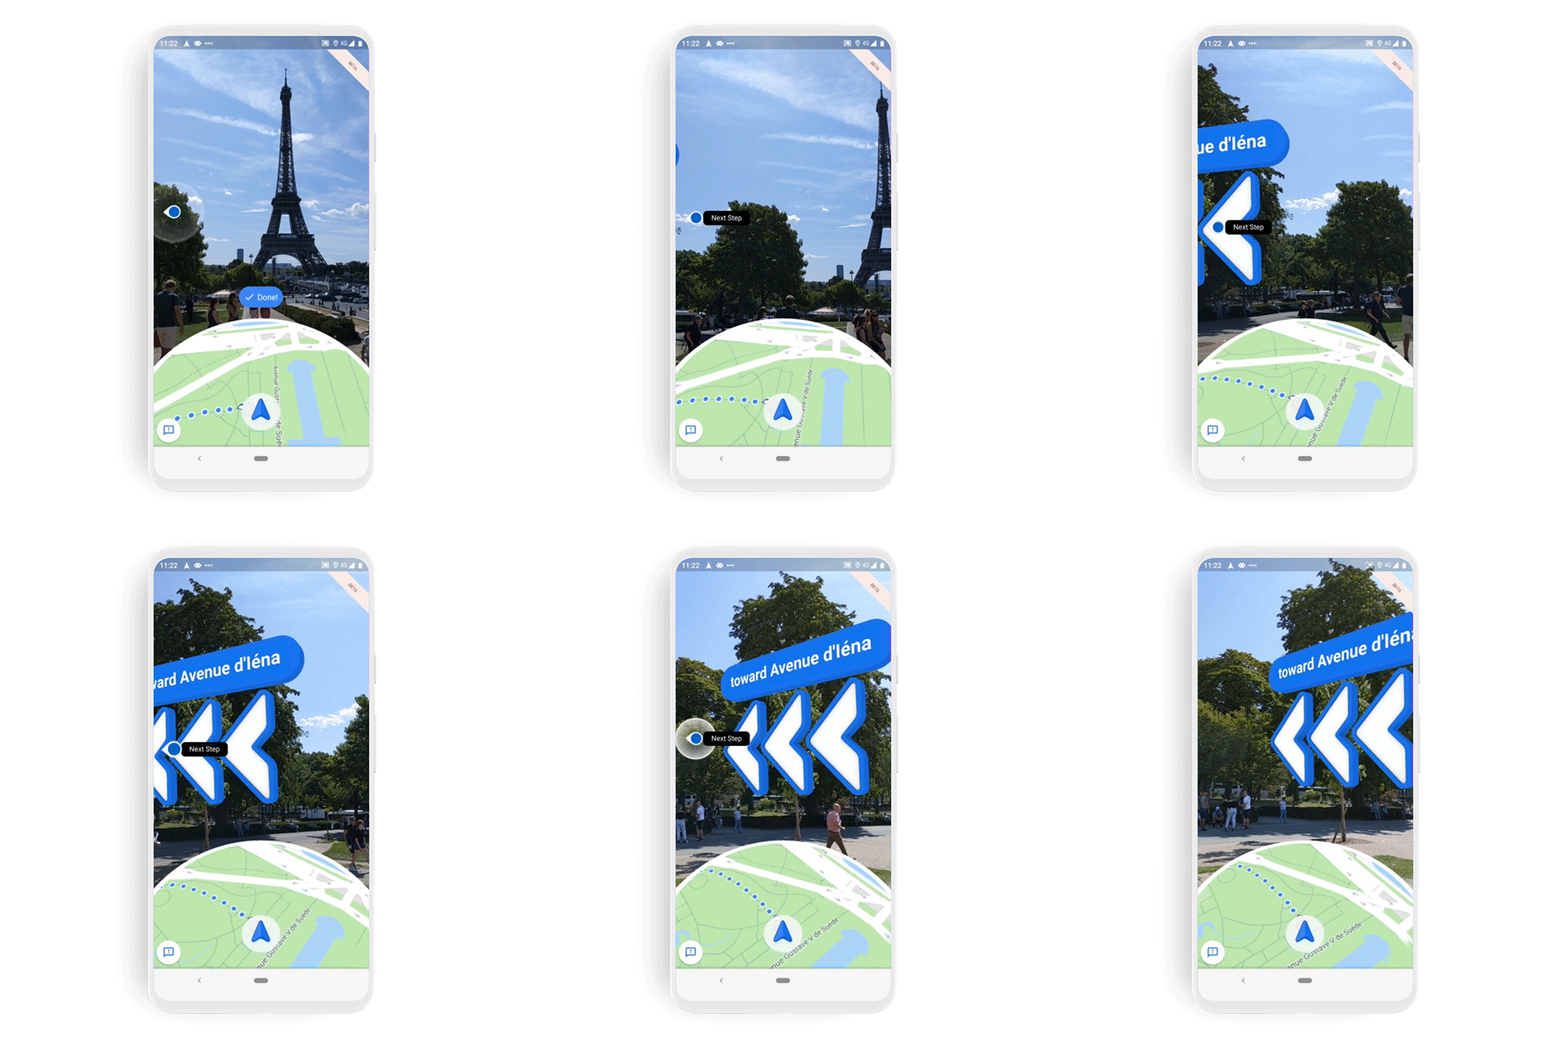
    After quite a few months of beta testing, Google finally rolled out its AR walking directions feature in Google Maps for all Android and iPhone users. Dubbed Live View, this feature in Google Maps smartly uses augmented reality to provide one with walking directions.
    What is Live View in Google Maps?

    How many times has it happened that you are using Google Maps for walking directions and end up on a busy street totally confused about where to go? With the Live View feature, Google is using AR to smartly solve this problem. Below is a quick demo of how the feature works.

    The feature is also great to have when Google Maps says you have reached your destination but you are confused as to where the exact building is.


    One important point to note is that Google has not made Live View with the intention that you look at the phone while walking. It is intended to be used when you arrive at a busy street and are confused as to which lane you have to go.
    How to Use Live View AR Walking Directions in Google Maps on iPhone

    Live View AR walking directions in Google Maps is available in all areas where Street View data is present. The feature is compatible with all iPhones and iPads which support ARKit.

    Google only just started rolling out Live View in Google Maps so the feature might not show up for everyone immediately. The rollout will take at least a couple of weeks to complete.

    Step 1: Search for any place in Google Maps where Street View is available. Tap the Directions button in the bottom action bar.

    Step 2: If the Live View AR feature has been rolled out for your Google account, you will see a Start AR button. Tap on the button to start using the new AR view for walking directions.Lan vs wan: diferencia entre ellos

    Aquí están las principales diferencias entre LAN y WAN

    Consulte este artículo


    In case the feature has not been rolled to your Google account, you should update the app to the latest version from the App Store and/or try again after a few weeks.

    Is Google Maps AR walking directions feature easier to follow? Let us know in the comments below.If you lost data after you updated to a new iPhone, you can always use Gihosoft iPhone Data Recovery to get the data back from the old iPhone or backup.You may also like: iphonerecovery.com


    Permanently Delete Safari History on Mac with 1 Click

    Permanently Delete Safari History on Mac with 1 Click
    What is Included in Safari History on Mac

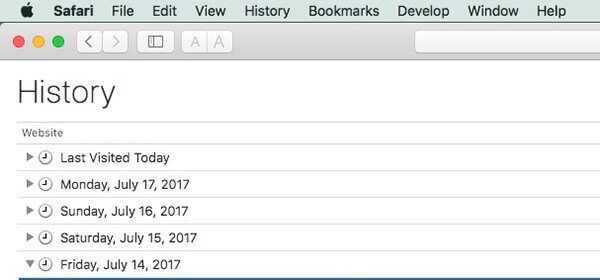
    Each and every website you visit is kept in your history so that if you want to open a specific webpage again, you can simply search it through the history and access it. In addition to the webpages you visit, there are many other things as well which get stored in the form of history. These all items are collectively known as Browsing History.

    Safari history does not only include the websites you visit. But it includes each and every item related to that website or webpage you visited. It includes all types of your searches, permissions, and information you filled on that website. List of other entities which are gathered and stored by your browser is given below:


    History of the pages you have visited.


    Back and forward list of a website you are using.


    List of frequently visited sites.


    List of downloaded items.


    Recent searches.


    Form fill-in and sign-in information.


    Web icons.


    Snapshots for opening webpage storage.


    Requests of websites to use your location.


    Requests of websites to send you notifications.

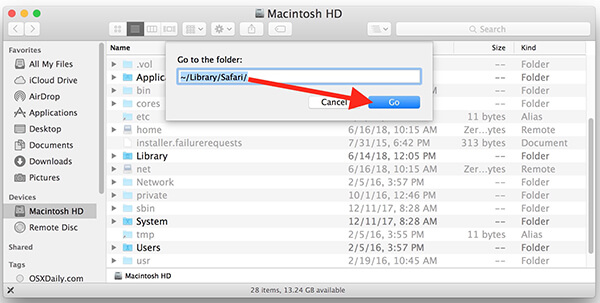
    You can easily find and check your Safari history on Mac by these steps: Go To Folder” and enter the following path: ~/Library/Safari/ , then you will see all of the Safari browsing history next.


    Why is It Necessary to Clear Safari History on Mac

    Till now you would have a general idea why it is important to clear safari history on Mac. It is obvious that whenever such a great amount of your personal and private information is stored in a browser, it can cause you much loss if accessed by someone else. Not only that you could face humiliation, but someone looking at your history can easily know what were you searching at what time. Your sign-in information such as your name, contact information, credit cards, etc. can leave you with compromised information and stolen identity. In addition to them, many websites store caches and cookies files on your operating systems. These are so much in quantity when totaled they can use a significant amount of your hard disk and account for slow browsing experience.

    Therefore, it is recommended that browsing history should be removed from time to time, not only to protect your privacy but to release an enormous amount of disk space as well.


    You have seen how many things are included in your browsing history. Now I will guide you on how to delete history on Mac safari in an easy and fast way. If you were to delete each and every of those items I discussed earlier, you would be definitely tired and end up by messing things up. But if I tell you about an Third-party software which can erase all that history within a few seconds and that too with few steps. Yes, you guessed right! I am talking about Umate Mac Cleaner, the best app for your Mac currently in the market.
    Use Umate Mac Cleaner to Permanently Delete Safari History on Mac with 1 Click

    Umate Mac Cleaner with its most efficient cleaning system allows you to get rid of your browsing history. It removes all types of online traces left behind your Safari browser. These types of traces include all types of browsing items and download history.

    When compared to others ways to remove Safari history, Umate Mac Cleaner is always dominant because of following reasons:


    With quick operations and easy steps, it helps you in deleting Safari history with just one click.


    Removes all Safari history permanently so that there are no traces left behind and make sure they won't be acquired again.


    Supported to clean up 5 types of privacy data to prevent personal information leakage.


    Gives you the preview feature, with the help of which you can preview the history before deleting them.


    Offers history removal for other browsers as well including Chrome and Firefox.

    If you lost data after you updated to a new iPhone, you can always use Gihosoft iPhone Data Recovery to get the data back from the old iPhone or backup.You may also like: iphonerecovery.com

    8/05/2019

    Apple to Reportedly Provide Security Researchers with Jailbroken iPhones


    Apple will seemingly be providing security researchers with ‘jailbroken’ iPhones so that they are able to easily find more vulnerabilities in iOS. As per Forbes, Apple will be making this announcement at the Black Hat security conference scheduled to be held from later this week (August 3-8, 2019).

    Apple will be handling out how these iPhones only to those researchers who are a part of its invite-only iOS bug bounty program. The iPhones handed out would be “dev devices” as per one of the sources. They would be more unlocked than usual iPhones and allow researchers to prod into iOS to find security vulnerabilities.

    Think of them as iPhones that allow the user to do a lot more than they could on a traditionally locked-down iPhone. For instance, it should be possible to probe pieces of the Apple operating system that aren’t easily accessible on a commercial iPhone. In particular, the special devices could allow hackers to stop the processor and inspect memory for vulnerabilities. This would allow them to see what happens at the code level when they attempt an attack on iOS code.

    Despite the ‘open’ nature of these iPhones, they are not going to be the exact same ones as used by Apple’s internal staff. They would be “lite” versions, with the units being used by Apple’s internal security team having a greater level of openness.Read Next:alternative to utorrent

    Read Next:fake file

    Read Next:pc not recognizing iphone


    Alongside this, Apple will also be announcing a macOS bug bounty program. Apple announced the iOS bug bounty program at the Black Hat conference in 2016. So, it makes sense that the company is taking the same stage to announce a macOS bug bounty program as well. It is unclear if the macOS bug bounty program will be based on the same guidelines as the iOS program i.e. it will be invite-only, with payouts not as attractive as other bug bounties.

    [Via Forbes]

    This Sleek Surge Protector Doubles As A Phone Stand [Deals Hub]


    Do you find it hard to get all your gadgets charged up with just the traditional outlet by your desk or bedside table? In today’s world, we’ve all got a plethora of devices that need to be powered up. The NTONPOWER 3-Outlet & 3-USB Port Surge Protector + Phone Holder eliminates the struggle of which device gets priority. And it’s available now in the iPhone Hacks Deals Hub for just $19.99 — 20% off the usual MSRP of $24.99 — in either crisp white or sleek black.

    The NTONPOWER gives you the ability to safely charge up six devices at once. Just take advantage of the three standard outlets, or utilize the three additional USB ports to make sure your gadgets are powered up. Unlike other surge protectors that are so bulky you want to hide them, the NTONPOWER is sleek and compact and offers you the added benefit of pulling double duty as a smartphone stand. Just plug your phone in and prop it up and you’ve got a handy source of hands-free entertainment!

    Get the NTONPOWER 3-Outlet & 3-USB Port Surge Protector + Phone Holder in the iPhone Hacks Deals Hub today. It’s available in both white and black for just $19.99.If you lost data after you updated to a new iPhone, you can always use Gihosoft iPhone Data Recovery to get the data back from the old iPhone or backup.You may also like: iphonerecovery.com


    7/07/2019

    How to Silence Robocalls And Spam Calls Automatically on iPhone


    Ignorance is bliss. And this is best applicable to unknown callers. Anyone who’s not in your contact book. They’re either a spam caller, a robocall, or an unknown number that you probably don’t want to talk to. If you’re privileged enough that you don’t need to pick up calls from anyone for your job or personal life, you can automate this blissful process using a new feature in iOS 13. Learn how to automatically silence unknown and spam calls in iOS 13.
    How to Silence/Mute Robocalls and Spam Callers on iPhone
    How This Feature Works

    Over the past couple of years, Apple has made it easier to deal with spam calls, robocalls, and spam SMS, but it was dependent on third-party apps. You can install apps like Truecaller to automatically block spam SMS and spam calls, or at least to alert you of robocalls. But in my personal experience, this rarely worked well. Others, especially in the west, have a better experience using apps like Nomorobo and Hiya. But still, nothing beats a global, built-in kill switch. Which is what the new iOS 13 feature is.

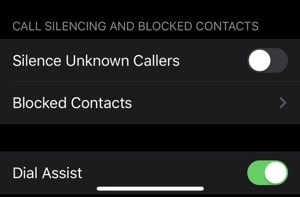
    It’s called Silence Unknown Callers and it does just that. It will automatically silence a call from anyone who is not in your contact book. You won’t hear a sound or any vibration, even if your phone is not in Silent mode. If you have a Voicemail setup, the call will be directed automatically to voicemail. This would be a good time to get a Visual Voicemail service on your carrier so you can read the transcript of the message later if you wish.

    If you don’t have Voicemail feature (which I don’t), the calls are just silenced and rejected. They’ll show up in the Phone app as a missed call and you can call them back if you want (unlike blocked calls). Or you can just enjoy the bliss.
    Automatically Mute/Silence Unknown Callers on iPhone in iOS 13

    This feature needs to be enabled from the Settings app.

    Step 1: After updating to iOS 13 on your iPhone, open the Settings app.

    Step 2: Scroll down and tap on the Phone option.

    Step 3: Here, scroll down to the Call Silencing and Blocked Contacts section.


    Step 4: Turn on the Silence Unknown Callers feature.
    More iOS 13 How-tos

    We’re working on bringing you more detailed guides for how to use the new and awesome features in iOS 13. Once you’ve read our iOS 13 tips and tricks article, read our how-tos below.

    Sponsor ads:

    Gihosoft RePicvid Free Photo Recovery Software provides a free photo recovery software for windows to help users recover the deleted or lost photo for free.

    If you lost data after you updated to a new iPhone, you can always use Gihosoft iPhone Data Recovery to get the data back from the old iPhone or backup.You may also like: iphonerecovery.com

    Featured Post

    iOS 12 group Facetime, Supports upto 32 people simultaneously

    Apple introduces a group facetime in iOS 12 that supports video call up to 32 people at the same time along with the LIVE Memoji. It’s ...