8/15/2018

How to Fix iOS 12 Taking Forever to Update?

How to Fix iOS 12 Taking Forever to Update?


1. Common Method - Force Restart iPhone

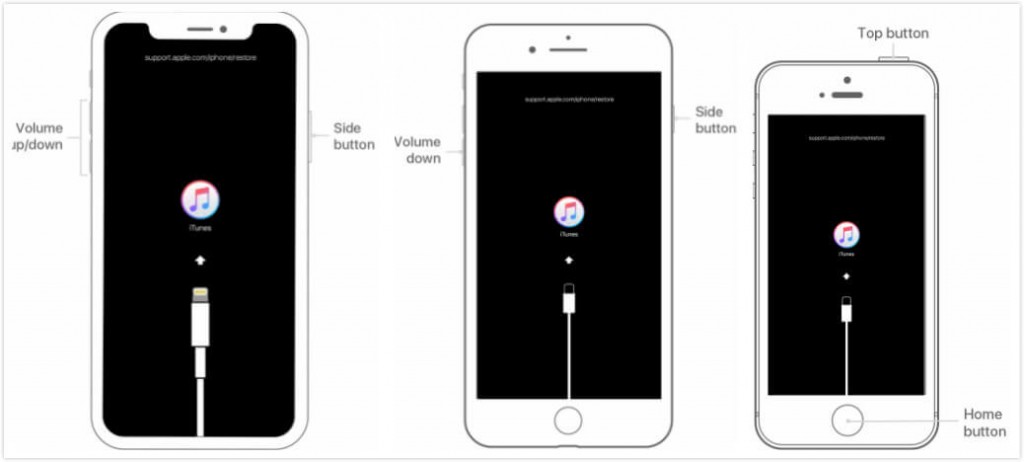
If iOS 12 is taking hours to update, you must go with the simplest way of solving the problem by forcing a restart on your iPhone. Depending upon your iPhone model, the restart is carried out in a different ways. For your ease, we have listed all of them right here.


For iPhone 6 and below, you need to thumb down the 'Home' and 'Power' keys till you get the Apple logo on your screen.


Likewise, if you have iPhone 7/7 Plus, you need to thumb down 'Volume down' and 'Power' keys simultaneously.


In case you are using iPhone 8, 8 Plus or X, you need to briefly tap the 'Volume up' button and repeat it with 'Volume Down' button subsequently. Lastly, hold the Power key down and keep it down until the apple logo appears.

2. Check Network Connection

There is a possibility that the network connection must be posing a problem and hence, iOS 12 is taking hours in updating your iPhone. If you are updating your device through the cellular data, you need to be sure that the network connection is consistent throughout the process. If it doesn't, we recommend you to use a Wi-Fi connection over Cellular data to stop iOS 12 taking forever to update.

3. Check If There Is Any Problem with Apple Server

Well, if you are still reading the article then most likely, the Apple server may have been experiencing tremendous traffic and has been down temporarily, triggering iOS 12 taking forever to update issue in not just your device but in several other devices too. Or perhaps, you might have been trying to upgrade your device when the Apple server is under the maintenance process. To ensure if it is the root cause to the disruption, you can check it with Apple customer service. Generally, when a new software is released, the server is usually very busy and some stuck issues could happen. In such a situation, we would suggest you to wait and update your iPhone some time later.
4. Reset Network Settings

You can reset the network settings in order to remove all the glitches that might have been creating hindrance in network connection if iOS 12 is taking forever to update.


Tap on 'Settings' and visit 'General' button.


In 'General' tab, select the 'Reset' and then hit on 'Reset Network Settings'.


If asked, then enter the passcode and proceed by confirming the selection.


5. Check iPhone Storage

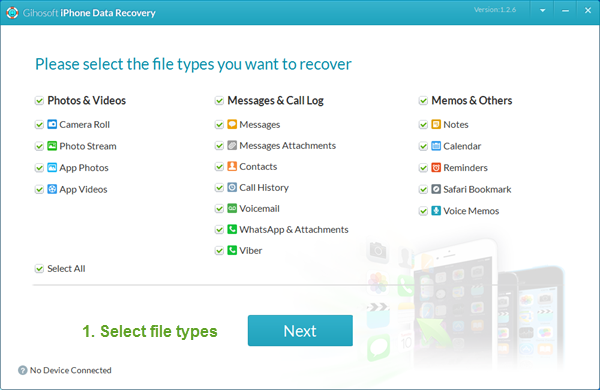
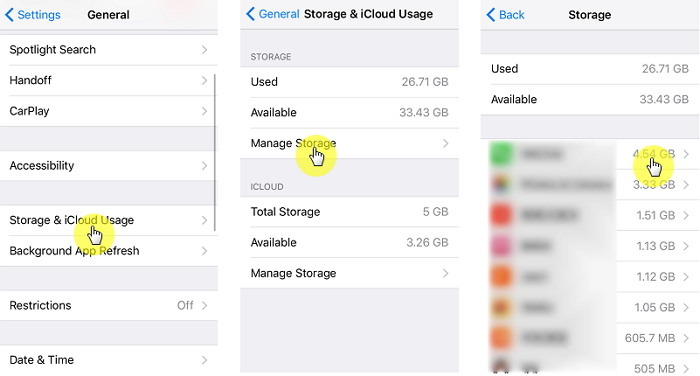
With the advents of newer updates, more storage is consumed by your device. So, as a golden tip, you must ensure that your device has enough storage or else you're mostly like to meet the problems like "unable to update", "iOS 12 taking forever to update" or the 'Download and Install button grayed out'. To check this, head on to the Settings, navigate to 'General' tab, then get into Storage & iCloud Usage => Manage Storage to check the status of your device storage.If you can’t sync with iTunes and want to rescue data from a disable iPhone, you could try Gihosoft iPhone Data Recovery. Also feel free to ask questions on the iDevice is disabled error in the comments section below.

Jihosoft Giveaway Alert:

iPhone Backup Extractor - Extract Data from iPhone Backup

The best iPhone Backup Extractor software to extract photos, text messages, contacts, voice memos, note, WhatsApp, Viber and etc from iPhone/iPad backup.

Must Read:Jihosoft iTunes Backup Unlocker

Jihosoft Android Data Recovery: the best Android Data Recovery software for Windows and Mac to recover deleted contacts, messages, photos, videos, WhatsApp and etc from Android devices.

6. Use iTunes to Update iPhone

If you have tried out the other steps and iOS 12 update is still not completed, then you can try to install the newest version using iTunes. Here's what you need to do.


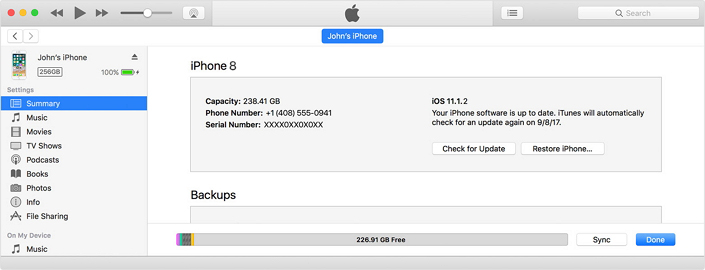
Connect your iPhone with the PC and launch the iTunes.


Select the device icon from the iTunes' screen and get into 'Summary' section.


Tap on 'Check for Update' button followed by the 'Download and Update' option. Your device would now be updated with the latest software iOS 12.

8/14/2018

9 Best Android Backup Apps : Backup Everything without root 2019

9 Best Android Backup Apps : Backup Everything without root 2019


Regularly taking a Backup of all your Android apps and other files are one of the most significant moves you can make to safeguard against losing your data.


Before factory resetting your Android phone, it is essential to backup your Android app data, messages, contacts, Emails, media, documents, and whatever else you have on your Android phone. Those are the user’s necessary files which should be stored at some safe place before any trouble occurs. Anyway, the disaster doesn’t wait for your call.

To backup your Android device, you don’t need to root it. Backup can be easily done without rooting an Android phone.

There are certain Android apps which provide free cloud storage to backup and upload your necessary files and data.

In this article, you are going to find some of the Best Android Backup Apps to backup everything from your mobile without root.


Recommend: With Gihosoft Free Android Data Recovery Software, you can recover data from Android without backup.

Here are the 8 Best Android Backup Apps To Backup Everything Without Root:


Google Drive


CM Backup- Safe, Cloud, Speedy


App Backup & Restore


Helium – App Sync and Backup (without root)


SYNCit


Easy Backup and Restore


G Cloud Backup

1. Google Drive


Main Features:


Safely store your files and access them from anywhere in any device (laptops, tablets, mobiles).


Easily share files and folders with others.


Set access levels for who can view, comment, or edit.


Use your device camera to scan in paper documents.


Use up to 13 GB free space.

Download Google Drive

2. CM Backup- Safe, Cloud, Speedy


Key features:


Contacts backup & restore (Avatars, birthdays, etc.).


Call logs, Messages backup & restore (SMS, MMS, text messages and Hangouts).


Backup & restore photos and videos without rooting your Android smartphone.


No root or other authorities required.


View and access your backup items on the laptop at https:\\cloud.cmcm.com

Download CM Backup

3. App Backup & Restore


Key features:


Backup & Restore APK to SD card, Phone memory or cloud drive.


Send & Share backups through Email or other channels.


Schedule automatic backup while you are unavailable.


Bulk & Batch backup, restore, send, upload.


Supreme app restore & Phone recovery, Samsung/Xiaomi/Lenovo/Motorola devices are supported.

Download App Backup & Restore

4. Helium – App Sync and Backup (without root)


Key features:


Contacts – Backup call log and SMS (no root required).


Accounts – Backup and restore from Drive and other cloud storage sites.


Automatic Backup schedules over WiFi.


Cloud backup, restore and sync of files such as contacts, messages, apk files, photos.

Helium App

5. SYNCit


Key features:


Backup and restore everything in one-click.


Keeps a permanent Cloud backup of all your contacts, SMS messages and call logs.


Restore them anytime even on a new Android device and access them wherever you want.


Backup and Restore photos or videos in just a single click.

Download SYNCit

6. Easy Backup and Restore


Key features:


Backup SMS, MMS, Call log, Calendar, Bookmarks and Dictionary and restore them quickly on your new Android device.


Easy data backup and restore over Google Drive, Dropbox, OneDrive or Box.


Save Backup to SD Card or Gmail.


Schedule automatic backups or manually create backups.

Download Easy Backup & Restore

7. G Cloud Backup


Main Features:


Auto Backup Messages (SMS), contacts, call logs, documents, settings, photos (at full resolution), videos, music and more.


Start with 1 GB free storage and earn up to 10 GB easily.


Automatic upload when WiFi is available and plugged in.


Access your messages, call logs, download contacts, share music, videos and view photos from the web: http://www.gcloudbackup.com


Protect the App with a passcode to maintain your backup security.

Download G Cloud Backup

8. DropBox


Main Features:


Backup photos and videos automatically from your Android device.


Manual or Scheduled backup photos and documents from your Android smartphone.


Access your backup from anywhere using any device (Mobile, Laptop, tablet).

Download Dropbox App


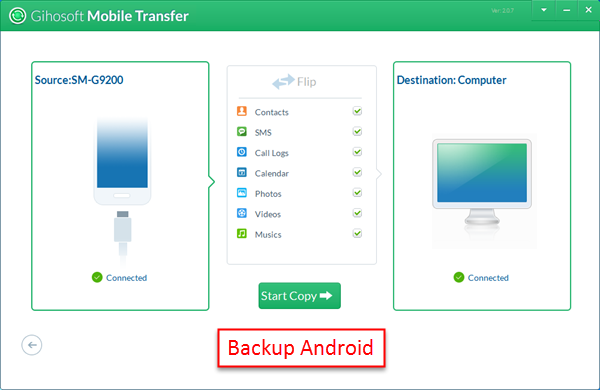
9. Bonus App: Gihosoft Mobile Phone Transfer


Gihosoft Mobile Phone Transfer is a multifunctional Android file manager, which can not only help you backup Android contacts, SMS, call logs, calendar, photos, videos and music to PC, but enables you restore backups to the original or another device. Moreover, it supports multiple Android devices, such as Samsung, Google Pixel, LG, OnePlus, Motorola, Sony, HTC, Lenovo, HUAWEI etc.


Related Posts:


Top 10 Ad Blocker Apps for Android

10 Best Free Audio Players for Android in 2018

Top 10 Best Instagram Photo Downloader for Androids

Top 10 Best Free Android Photo Editors in 2018


Well, these are some of the best backup apps for Android OS. If you liked this post, don’t forget to share it with your friends on Facebook and Twitter. Share your suggestions in the comment box.

8/12/2018

[Solution]How to Get My Pictures from iCloud 2019

[Solution]How to Get My Pictures from iCloud 2019
[Solution]How to Get My Pictures from iCloud?
Get My Pictures from iCloud?
1. Get Pictures from iCloud by Turning on My Photo Stream

The first way to get photos from iCloud is to turn on My Photo Stream. By turning on My Photo Stream, all your new photos will be uploaded to iCloud, provided that you have a reliable Wi-Fi connection. When your iCloud library is not turned on, all of your new captured photos will appear automatically on your iOS 8 and 9 devices. However, if your iCloud library is turned on, your photos will appear in ‘All Photos’, instantly becoming a part of your photo library. Moreover, by turning on My Photo Stream, all of your photos will automatically appear on all your iOS devices, computers and even on your Apple TV.Sponsor ads:10 Best Game Download Sites for PC & Android
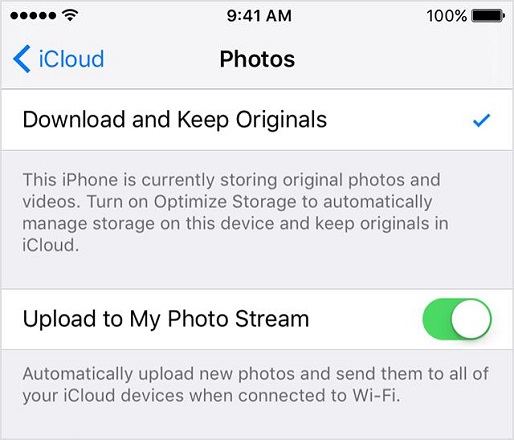
For iOS Devices
Go to Settings.Must Read:save twitter videos
In the menu that appears, select iCloud.
A new menu is going to open, select Photos in that menu.
Turn on My Photo Stream from the Photos menu.


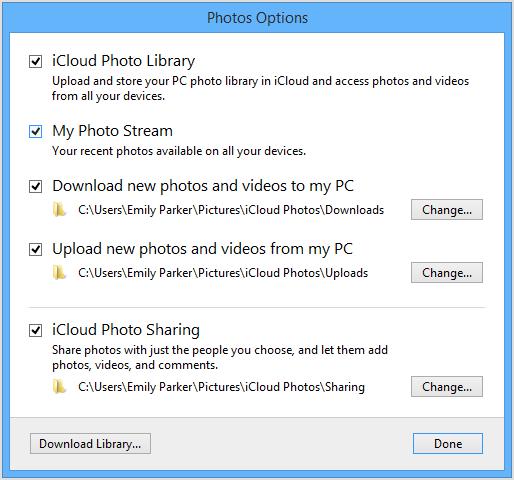
For Windows Computers


On your computer, download and install iCloud for windows.


Now open it and turn on photos.


Now click Options and then My Photo Stream.


Now Click Apply.


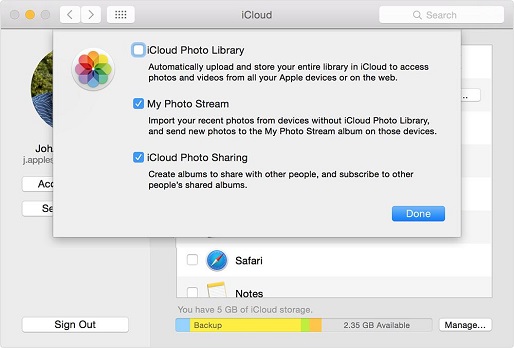
For Mac Computers


Select system preferences from the Apple menu.


Now click iCloud and select Photos.


Now click on Options to see whether My Photo Stream is turned on or not.


For more details, follow the below link: https://support.apple.com/en-us/HT201317
Disadvantages of This Method


The iCloud server saves the photos and images present in My Photo Stream for a period of only 30 days. So, there is a chance that some of the photos you are trying to recover aren’t available there at all.


Your iPhone, iPad, and iPod touch only keeps around 1000 of the most recent photos in the My Photo Stream album. So, once again, there is no surety that the photos you are looking for are even available in the My Photo Stream album.You may also like:
jihosoft file recovery
Gihosoft Free Android Data Recovery can help you easily recover lost data such as photos, videos, contacts, text messages, WhatsApp & Viber chats from Google Pixel/XL or other Android phones effortlessly.
You may also like:
Jihosoft iPhone Backup Extractor Extract and recover all types of data from iPhone backup files, such as camera roll photos, videos, SMS, contacts, reminders, WhatsApp, and etc.
Also Read:Best 6 Photo Organizer – Photo Organizing Software for Windows & Mac
Also Read:10 Best Free Audiobook Apps for Your iPhone or iPad in 2019
Also Read:How to Fix Insufficient Storage Available Problem on Android
Also Read:How to Recover Deleted Contacts with Gmail Account on Android
Also Read:How to Change Message/iMessage Background on iPhone with/without Jailbreak
Also Read:5 Best Music Player for PC to Free Download 2019
Also Read:How to Setup Dual Monitors in Windows 10 Computer 2019
Also Read:How to Permanently Delete Photos and Videos from Samsung Mobile Phone
Also Read:5 Best Free Movie Streaming Sites like Pubfilm to Watch Movies Online 2019

8/10/2018

How to Unlock iPhone without Password 2019


How to Unlock iPhone without Password 2019
Method 1: Use Siri to Unlock iPhone without Password

Have you heard about Siri bypassing? It is the first excellent method you may want to use to unlock iPhone without using a password at all. The best part is that it is not difficult to do. However, if Siri is not enabled on the iPhone you want to unlock, you may have issues, but that can be solved quickly. Follow the steps below to unlock an iPhone with Siri.


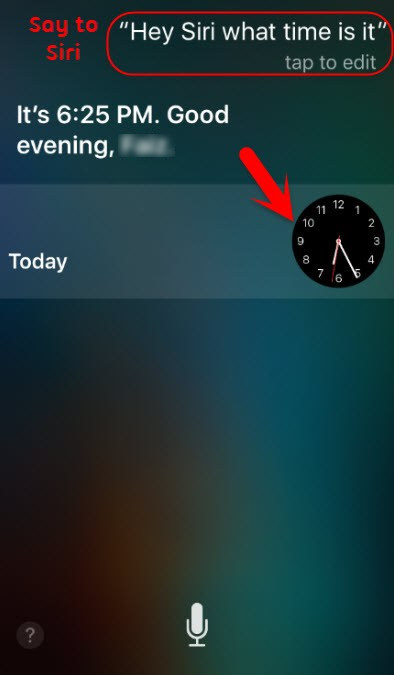
Press and hold the Home button of the iPhone, the ask Siri "hey Siri what time is it?. if Siri is disabled, move to the next step.


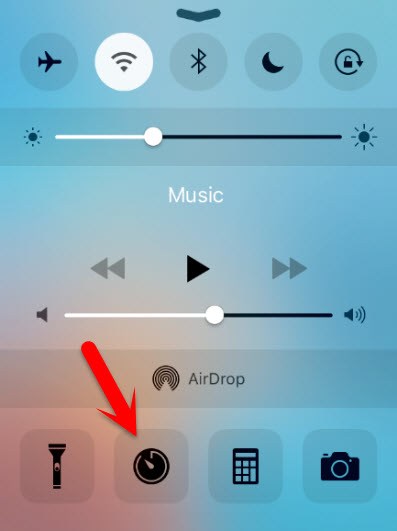
Open “Control Center” and tap on “Clock”.


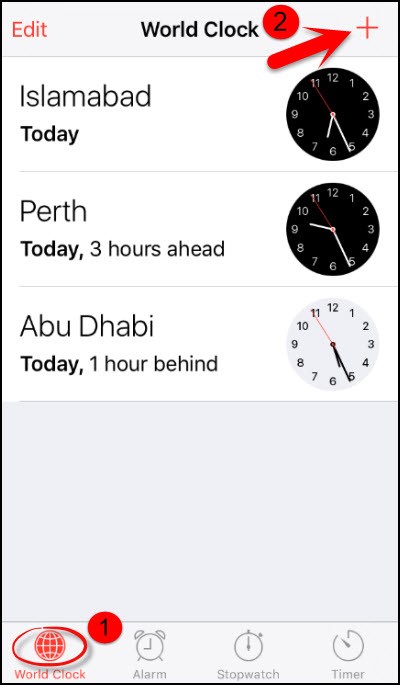
tap on “+” button to add world clock.


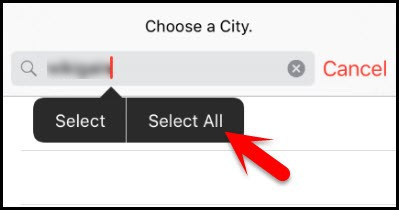
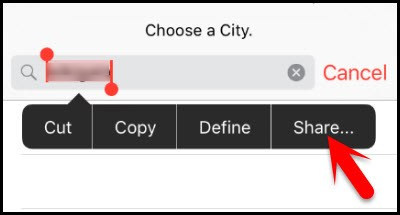
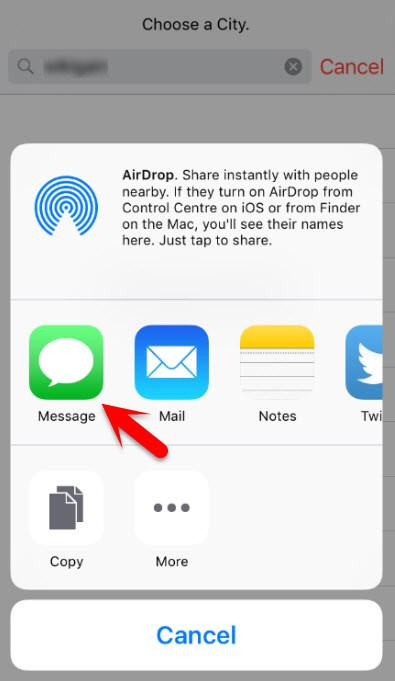
Now on the search box type anything and tap on “Select All”, then select “Share”. If you can’t see “Share”, then try a few more times to see it.


Then choose “Message”.


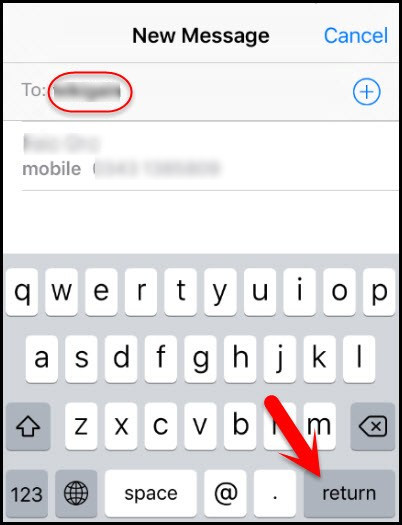
Now type a name following “To:” and tap on “return”. When the text changes to green, tap again.


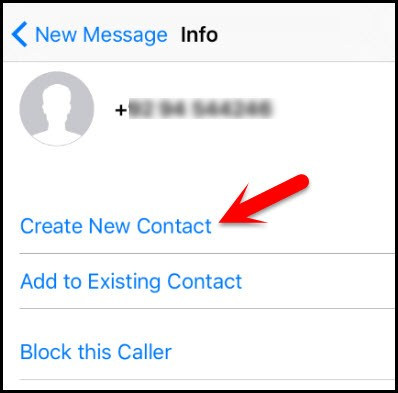
Locate "Create New Contact" and tap.


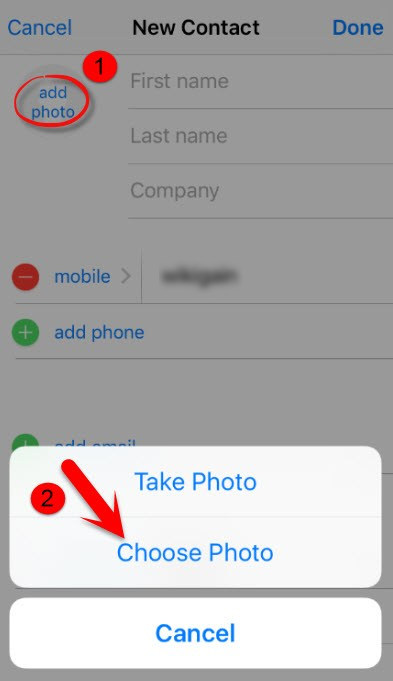
Click on Add Photo which is below the mugshot icon, click "Choose Photo".


You have just accessed the iPhone without a password.


Method 2: Use iTunes to Unlock iPhone without Password


You can also take advantage of iTunes to open a locked screen. Below are steps you need to follow.You can also take advantage of iTunes to open a locked screen. Below are steps you need to follow.


Press down the power button until you see” Slide To Power Off.” Power it off.


Go to your PC and open iTunes.


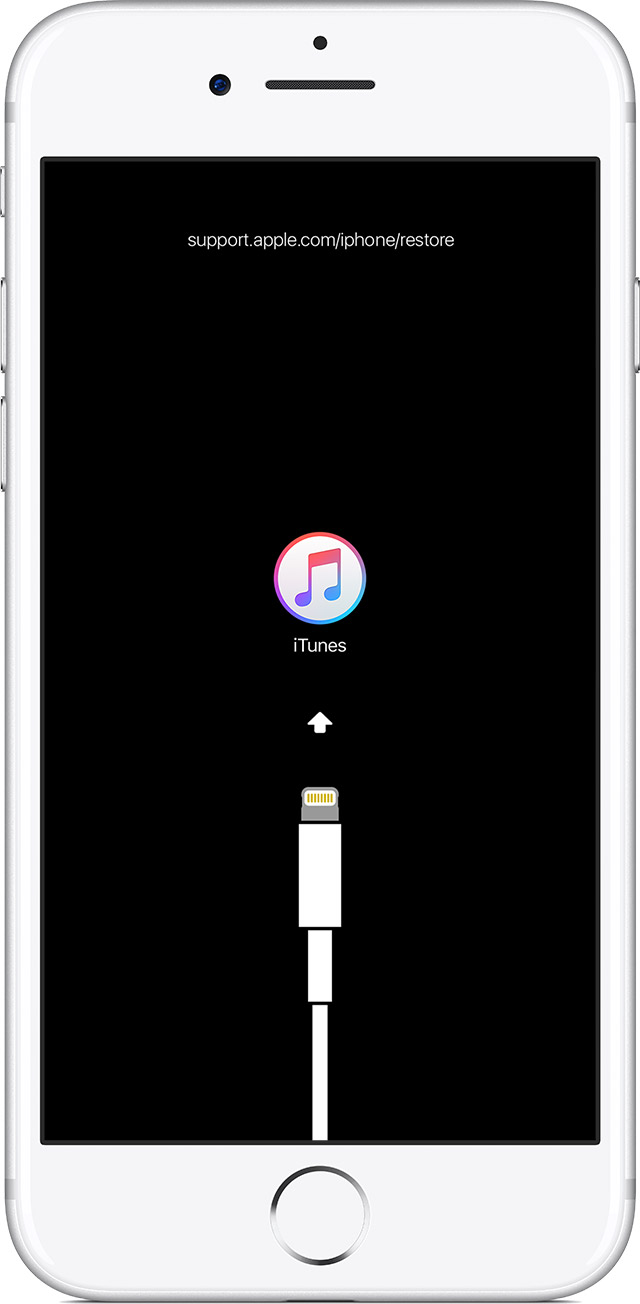
While holding down the Home button, plug your iPhone into the PC. The device will power up in Recovery Mode.


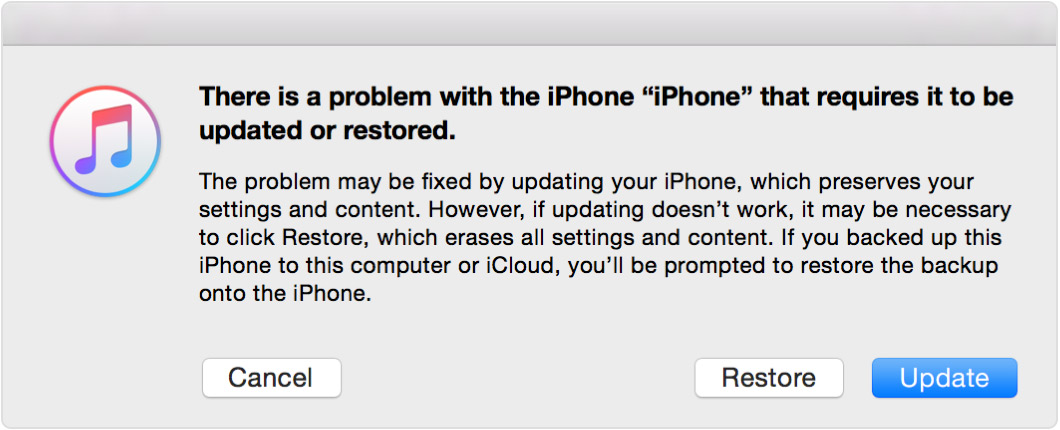
Click OK. Then, restore and update the device. iTunes will restore the iPhone.


Method 3: Use iCloud to Unlock iPhone without Password

Follow the steps below to use iCloud to unlock a locked screen. This can work for both iPhone and iPad.


Go to “Find My iPhone”.


Sign in to iCloud with your details.


Click All Devices and select your device.


Click "Erase iPhone," and supply your Apple ID and any phone number.


Turn on your device, and wait for few minutes for iCloud to restore your device.


Restart your device and follow the set up prompt.


Click “Restore from iCloud Backup” and you are done.

You can also watch this YouTube video to know how to unlock using iCloud.

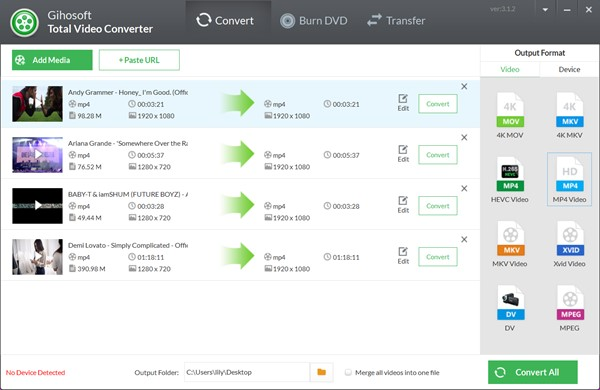
Gihosoft Total Video Converter is a professional all-in-one video tool that enables you to convert videos and audios into various different formats. You can also download videos from YouTube or other online video sharing sites and convert them easily. Plus, you’re able to personalize your videos with its inbuilt editor, such as, trimming, cropping, applying video effects, adding watermark, subtitles, and more. If you need a powerful and professional desktop video converter program, just download Total Video Converter and follow the step-by-step guide here to have a try.


Jihosoft Android Data Recovery: the best Android Data Recovery software for Windows and Mac to recover deleted contacts, messages, photos, videos, WhatsApp and etc from Android devices.


Gihosoft Free Android Data Recovery can help you easily recover lost data such as photos, videos, contacts, text messages, WhatsApp & Viber chats from Google Pixel/XL or other Android phones effortlessly.


If you lost videos from iOS Camerall Roll which are nowhere to download again, you can use Gihosoft iPhone Data Recovery to get back deleted videos from iOS device including iPhone, iPad and iPod Touch.


Any app suggestions or topic recommendations are appreciated in the comments down below.


8/09/2018

How to Save/Download Instagram Stories on iPhone


How to Save/Download Instagram Stories on iPhone

Instagram is the best and most widely used online photo and video sharing app. These social sites are a platform that enables to share moments in the form of posting photos, videos, stories and more.

Worth Reading: How to download Instagram Photos on iPhone
Saving Instagram stories in your iPhone


Instagram stories don’t need to be in paragraphs, they are simple photos speaking for themselves. If you come along an elegant dress or a restaurant you want to visit, you would like to save it for the future. Instagram can be anything and everything from your pet act, travel tales, pals get together and limitless events taking place with you.

Instagram gives us many benefits but lacks in just one way. It doesn’t render its users to download or save Instagram photos or stories on your iOS devices. Move down to the procedure of downloading Instagram stories instantly on your iPhone so that its stays like a memory.
Steps to Download Instagram Stories in iOS devices


Move in to App Store in your iPhone or iPad.


In the search bar, type ‘Repost for Instagram Story Video Photo Saver’ app.


Install the ‘Repost for Instagram Story Video Photo Saver’ in your iPhone and iPad.


Open the app and login to your Instagram account.


View your friends Instagram stories and tap on anyone one.


Select the profile icon or image to open the story.


‘Download’ the image and find it directly in your Gallery.

Download Repost for Instagram Story Saver for iphone

The process is so easy on iOS. Why wait! Search for your favorite follower and using the app download, post, repost pictures on other messenger like Whatsapp, facebook. Simply, download the desired app in your Android and iOS and download whatever catches your attention.

Make sure you enter the correct username of your Instagram profile and easily save them even after 5 months. Download previous stories which cannot be done with your Android device.
Over to you!

Every coin has 2 faces; the downloaded photos cannot be re-uploaded on other social media pages, even misusing these stories is an offense. Instagram stories come with copyright issues, make sure you take approval from the owner before posting it.


If you ever lost any photo or video that saved to your iPhone camera roll, you can easily recover them with Gihosoft iPhone Data Recovery.

Gihosoft Free Android Data Recovery can help you easily recover lost data such as photos, videos, contacts, text messages, WhatsApp & Viber chats from Google Pixel/XL or other Android phones effortlessly.


8/07/2018

Best Antivirus Software for macOS Mojave 2019


Best Antivirus Software for macOS Mojave 2019

Computers are used for many purposes and more of your information and data is stored on your Mac only. However, if you still haven’t thought of protecting your Mac from various malware attacks then your important data is in real danger. In case you have decided to buy antivirus for your Mac then we have collected best antivirus for macOS Mojave 2018.


There are a lot of antiviruses, anti-malware, anti-spyware and such things are available, but the question is, are they worthy? The answer is no because they can block your system, delete the data and harm your MacBook Air in many ways. So we would suggest you take a look at the list we’ve made and chosen one.
Most Essential Best Antivirus Software for macOS Mojave
#1.Bitdefender Antivirus for Mac

Bitdefender antivirus is amazing according to its performance as well as the interface. In seconds you will get scanning results of the entire Mac without affecting the CPU of the system. The most popular malware which is used by hackers to seize your data right from your laptop is ransomware. But there is no need to worry if your MacBook has Bitdefender installed and protect every single bit with multi-layer security. Time machine backups are safe within your PC and along with this software can easily handle adware.

Get rid of add-on install and defective toolbars which get downloaded automatically on your device. It will cost you $29.99 for one Mac and when you buy for more Macs then the price will be affordable.
#2. Malwarebytes Premium for Mac

If you are looking for an antivirus which can remove malware in real time then Malwarebytes is good for your macOS Mojave. Malwarebytes anti-malware software is made up of advanced technology which takes instant action against virus and malware. This antivirus is suitable to the new update of Mac that is macOS Mojave, neither it will degrade the performance of the Mac not it will occupy much storage.

There are two versions available one is free which contains limited functions and other is premium version. If you are interested to protect your MacBook Pro then go for the premium version, it will cost you $39.99 (Annual Subscription).
#3. Norton Security for Mac

I bet you have already heard this name before and some of you have used Norton Security in your Mac. Asides from what normal antivirus offers it also provides alerts when you try to download and install the corrupted apps. It will also help you to clean the hard drive of Mac by removing corrupted downloads, junk files, suspicious content and more.

A wide range of functions and options are available so that you can choose the necessary features and mainly you can afford. There are many options are available like automatic backups, cloud storage, an online portal for managing other devices and more. An annual subscription will cost you $29.99.
#4. Avast Security for Mac

Avast security leads in the category of best free antivirus for macOS Mojave. All the basic features like home network scans, scheduled scans, antivirus and protection of web, files and more. But if you prefer to buy paid version then additional benefits such as Wi-Fi inspector, ransomware shield, real-time protection against viruses, spyware, and Trojans.

Browse on web safely, protect Email attachments, and other threats are prevented from Mac. Even it will block downloading the contents from the unsafe website. You have to pay $49.99 for the paid version of Avast Security.
#5. Eset Cyber Security for Mac

Protect your external hard drive along with internal hard drive with Eset Cyber Security. All in one security software is good for Mac’s health and powerful performance. You can play the game, watch movies, browse web pages, and download files safely while Eset Cyber Security will protect your macOS Mojave.

Like others, it will also cost you $29.99 but it consists of unique features like anti-phishing, cloud-powering scanning, automatic updates, Anti-theft, personal firewall and parental control. If you are not sure about this antivirus then you can try trial version for 30-days and then decide to buy or not?
#6. AVG Antivirus for Mac

AVG has been performed very well in past years. The desktop version has an attractive interface and provides trustworthy protection to your entire Mac. The basic version is recommended for normal use but if you are hard user and all-time inserting external drives or downloading files from the web then paid version will secure your Mac.

in addition, if you buy a subscription then you will get additional protection against hacks and online transactions. Scan the whole Mac or perform customize scan and eliminate the files which are a real threat to your macOS Mojave.
#7. Sophos Home

The Sophos Home is build up to bring ease significantly in managing more than one Mac’s using the single account. Yes, you can manage up to 10 Mac’s with the one account. But you can only do using web interface. the antivirus works in the background and protects Mac from malicious content and even it prevents danger from the browser.

Besides, you will also get parental control facility with Sophos Home. There are a lot more features are still not introduced in this paragraph but with its easy interface you will get to know about its more functions if you download it.

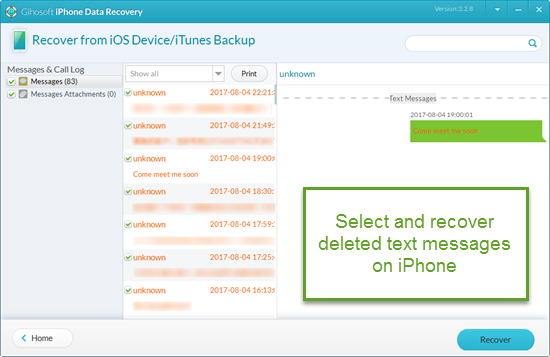
Plus, if you lost or mistakenly deleted important messages on your iPhone, you can use Gihosoft iPhone Data Recovery to recover deleted iPhone texts on Mac.

Jihosoft Android Data Recovery: the best Android Data Recovery software for Windows and Mac to recover deleted contacts, messages, photos, videos, WhatsApp and etc from Android devices.


You may also need:


Top 10 Video Editor Apps For iPhone or iPad 2018


Best Free Video Downloader Apps for iPhone/iPad in 2018


How to Create an Apple ID without Using a Credit Card

Any app suggestions or topic recommendations are appreciated in the comments down below.

8/01/2018

How to Fix Share My Location Unavailable "Unable to Connect to Server" on iPhone X iOS 11

How to fix Share My Location Unavailable "Unable to Connect to Server" on iPhone X iOS 11

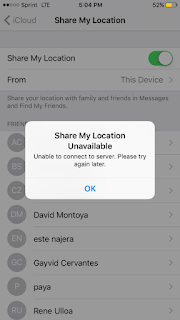
Many iphone X/8 and iPhone 7/6s /iPad users are facing issue with share my location feature iniPhone, specially after upgrade to iOS 11.4 and even with iOS 12 beta3. This is weird and annoying as you will be unable to see friends in Find Friends or any devices in Find iPhone (though others can see me). Other location services are working correctly. Select Share My Location from Location Services, a pop up says “Your Device Is Not Connected to the Internet” and when user tries to toggle share my location on and off, I then get a message Share My Location Unavailable Unable to connect to server. Please try again later.


One iPhone users quoted it as

So I have an iPhoneX and anIpad mini and I share my location on both products. All of a sudden today I started getting this message when I tried to change my location to a device: "Share My Location Unavailable. Unable to connect to the server. Please try again later." Also can not log in to find my iPhone and check other peoples location on find my friends. HELP PLEASE


In such cases if is recommended to check the system status of all Apple server for the specific service. You can check them here Check Find My Friends on the System Status page for issues.


Fix Share My Location Unavailable "Unable to Connect to Server"


Fix 1: Update iCloud location sharing settings

Please first go to settings -> Apple ID (Tap your name at the top of the settings list)-> "FamilySharing" -> "Location Sharing" On.

Now next step -Update icloud : Settings > iCloud >Share My Location > From (this device). On the select “This Phone" and now test this and it should work fine


Fix 2: Toggle all location services

Settings->iMessage-> turn Messages off.

Settings->Cellular->turn find friends off.

Settings->iMessages->turn on

Settings.->Cellular.->find my friends to on

Settings->Privacy->.Location services.->Share my location->.should be on

Fix 3: Restart the location service

Turn off both all Apple devices to share location, iPad and iPhone. Reboot iPhone/iPad, turned off location sharing - reboot again. Turned it on and turned on location sharing again. Now it should be working fine.

Sponsor Ads:

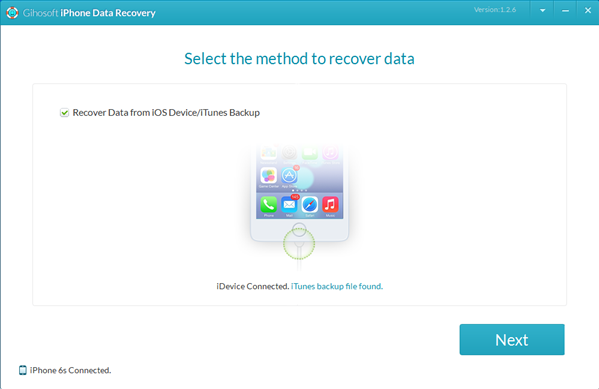
Gihosoft Free iPhone Data Recovery is a professional iPhone Data Recovery software to get back all your lost text message, photo, video, call history, note, contact and more from iPhone/iPad/iPod Touch. It offers a full solution to recover your lost data in different tough situations. Besides recovering data directly from iPhone, iPad and iPod touch, it also allows you to recover data from iCloud and iTunes backup files.

iPhone backup unlocker:Recover iTunes Backup Password.

iPhone backup extractor free:The best iPhone Backup Extractor software to extract photos, text messages, contacts, voice memos, note, WhatsApp, Viber and etc from iPhone/iPad backup.


Featured Post

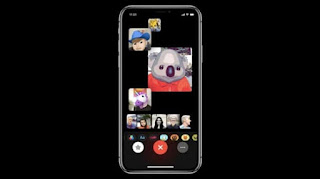
iOS 12 group Facetime, Supports upto 32 people simultaneously

Apple introduces a group facetime in iOS 12 that supports video call up to 32 people at the same time along with the LIVE Memoji. It’s ...