To be a good photographer, it takes more than just a good camera. That being said, the technology is also important, and this also applies to smartphone photography. With the help of a few tweaks, a few apps and without additional knowledge, here's how you can get more out of your smartphone's camera. We've just added a couple of new tips for taking better sunset and party photos, plus an expert guide to bokeh effects.
How to Hide Private Pictures on Any Android Phone
Top 5 Best Cameras Apps for Android to Take the Perfect Selfie
Jump to section
Preparation
Photographic technology
Subject selection and design
Master the bokeh mode
Tips and tricks for smartphone photos: preparing your smartphone
Smartphone photo tip: best resolution and picture quality
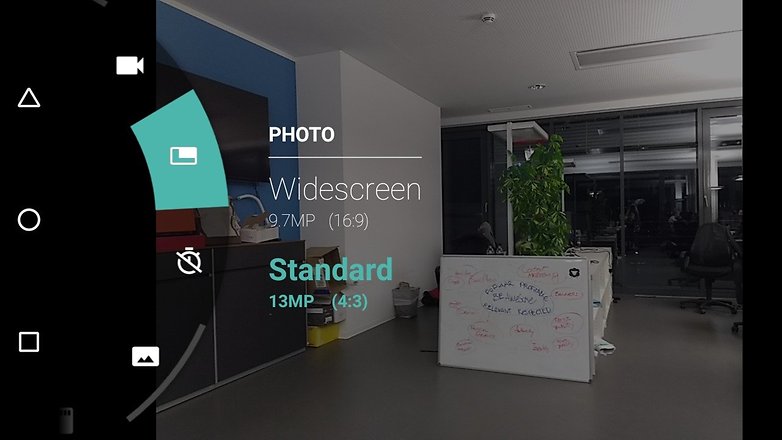
Before you get started with your smartphone camera, take a look at the settings. Frequently, the factory settings are not optimal. Sometimes a lower resolution is set. Often, this provides for a better digital zoom – but you should also follow our advice below. It is also advisable to adjust the aspect ratio so that you get the largest possible picture. The screenshot below shows the 16:9 format, because in the 4:3 format, pages are truncated. With other smartphones, it can be the exact opposite: the 4:3 format creates the largest photos, but the 16:9 images cut off part of the picture. Afterwards, you can select the best image detail.
 Have even more fun taking pictures with our smartphone camera tips. / © AndroidPIT
Since high-definition pictures consume more memory space than those with low resolution, you should always have a microSD card – of course, this is only if your smartphone has the corresponding card slot. If this is not the case, save your old photos and empty the memory before taking more pictures.
 Use the maximum resolution and picture quality for the perfect snapshot. / © AndroidPIT
Smartphone photo tip: clean the lens
Make sure the camera lens is free of dirt and fingerprints. The smartphone probably spends most of its time in your jacket pocket or purse, where dust can get on the lens. It’s best to wipe a cloth over the lens before taking a photo. Use a commercially available microfiber cloth or a cleaning cloth from the optician to clean the lens without scratching it. Facial tissues are also good if necessary, but they sometimes leave behind fine and annoying dust.
Tips and tricks for smartphone photos: technology and focus
Smartphone photo tip: finding the right exposure settings
In photography, three values are relevant to the photo: exposure time, aperture, and ISO values. Together, they determine how brightly the photo is exposed, how sharply the background is focused, and whether an object in motion is blurred in the image.
Aperture: For smartphone photos, you usually cannot adjust the aperture, because it is fixed. Therefore, it is important for smartphone photographers to find the right settings for the ISO value and exposure time. In automatic mode, the camera determines these independently, but the manual mode often provides better and more precise results.
Exposure time: Long exposure times are an option for improving the illumination of your photo, especially in poor lighting conditions. However, this causes moving objects to create streaks. This effect can be used artfully for rivers or in night views of a city. Short exposure times, on the other hand, actually freeze a moment in time.
ISO values: The second value you should understand is the ISO value. This indicates the light sensitivity of the sensor. The higher the value, the more sensitive. With a higher ISO value, you can, for example, shorten the exposure time and thus provide sharper pictures. In dark environments, you often need a high ISO value and a long exposure time.
So why not always shoot with a high ISO value? The reason is simple: a high ISO value also creates more noise in the image. Each smartphone behaves a bit differently: some smartphones have camera noise problems at ISO 400 or 800, while others have noise problems even sooner. Therefore, you should learn how your smartphone camera handles this, and find out which ISO value leads to exact, acceptable results. For most situations, values up to a maximum of 200 are ideal.
Tips: Nowadays, photos play an important role in everyone’s life – they help us capture beautiful moments, connect us to the past, and remind us of the people we met, the places we traveled, the feelings and touching stories of the time. However, Life is always full of small accidents, sometimes these precious photos may suddenly disappear or be deleted by mistake, at that moment, you may have broken your heart and wonder how you can retrieve them quickly.
Never fear! Actually, the deleted photos are not really gone, you still can recover them by using a powerful Android photo recovery software, like Gihosoft Free Android Data Recovery. Just as its name implies, it’s specially designed to help Android users restore deleted files from Android phone. Thus, no matter your photos are lost for whatever reasons, you can quickly recover deleted photos from Android by using this program.
Smartphone photo tip: set the focus manually
For a successful image, a lot depends on the right focus. The autofocus is usually helpful, but it is not flawless. After all, it often does not know what we really want to have in focus. A touch of the finger is enough to avoid this problem, because the touch focus is the solution. Touch the screen where you want the camera to focus. In the manual mode of the camera app, you can even focus the camera completely manually.
Smartphone photo tip: take multiple shots, sort them out later
Instead of relying on the perfect snapshot, it’s better to take multiple snaps of your subject. If the only photo of your romantic kiss in front of the Eiffel Tower in Paris is out of focus, you will probably regret it later. Just snap each subject several times and pay attention to the autofocus. And do this enough times until you think: that’s definitely a good picture. Nowadays, top-of-the-line smartphones offer a serial image function, which allows the camera to take several photos in a series with just one press of the button.
Smartphone photo tip: two-handed use
Fast snapshots often come to life in the midst of the deficiencies and dynamics of the moment, so they may be a bit shaky. But if it is to be completely clear, casual one-handed photography is simply not enough. Keep your smartphone steady and stable with both hands. A tripod with a smartphone holder is ideal for the perfect stand, but it is also often enough to support the smartphone on a railing and to stabilize it that way.
If this is not possible, then you should try to support your arms, or completely extend them. The less you move the smartphone, the sharper the captured photo will be.
Tips and tricks for smartphone photos: subject and perspective
Smartphone photo tip: rule of thirds
The rule of thirds is a simplified implementation of the golden ratio. The image is subdivided by means of two horizontal and two vertical guide lines, so that these create nine uniform boxes. For many smartphones, you don’t have to imagine the grid, because you usually have a function in place that serves as an aid. The subject should then be placed on one of the four intersection points of the grid, or also along a line, so that it is properly set in the scene. In landscape shots, it is useful to align the horizon on one of the two lines.
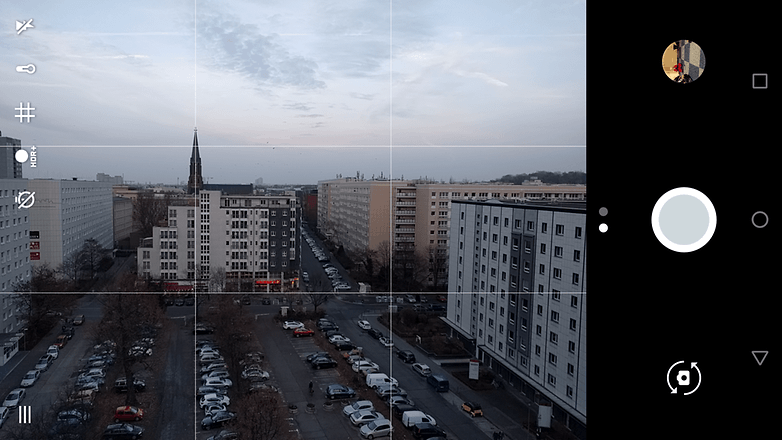 Help lines assist you with image composition / © AndroidPIT
With the rule of thirds, a great photo composition is child’s play. There are additional settings for the help lines. Some apps can display the help lines also in the golden ratio, which can result in minor differences in the image design.
 Some apps can help you further with the golden ratio. / © AndroidPIT
Smartphone photo tip: straight horizon
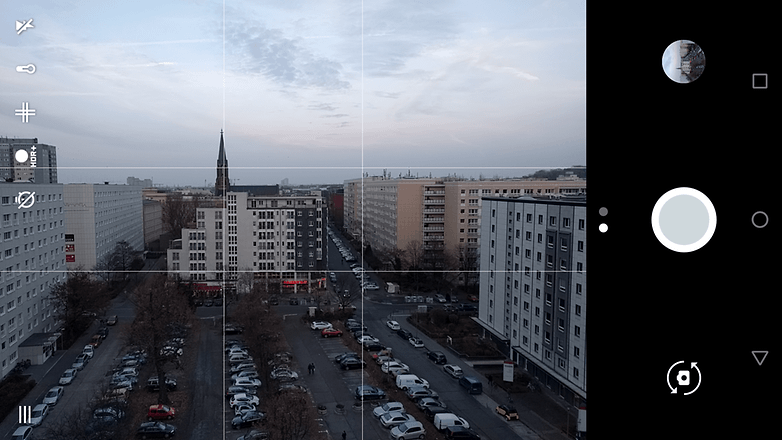
This tip is linked to the last one, and here you can also use the embedded grid in the viewfinder. Crooked lines bring unrest into a photo, unless it is intended. The horizon is the dominant line when looking into the distance, so ensure that the horizon is not crooked.
 In this picture, the plant in the left-third of the foreground gives the image depth, but the crooked horizon is disturbing and brings unrest into the picture. / © AndroidPIT
Smartphone photo tip: rule of space
As already mentioned, some subjects in the photo also need space “to breathe or to look.” Like the golden ratio, another element can create more harmony in a photo. Using the rule of space correctly, it creates a sense of movement, activity, or completion in the composition. With a portrait, the gaze of the subject can wander into the distance, and it is often ideal to leave space in the direction of the eyes, and to not cut off immediately at the face. For example, the gaze can also express the fact that the person portrayed is just concentrating – which often brings more life into the photo.
If you photograph a moving car, you should also leave room in the place where the car is driving to, instead of just showing the asphalt the car is on. This rule, like the rule of thirds, can and should be broken when a photo demands it and promises to become something special.
 Space rule: give your subject some room “to breathe.” / © AndroidPIT
Smartphone photo tip: ensure elements in the foreground
Photos depict the three-dimensional space around us. If your subject is quite far away, however, it can be useful to enhance this with several image layers. A person, a tree or another object in the foreground breathes life into an otherwise stark panorama, because its presence lends the overall picture more depth.
Smartphone photo tip: photograph from above
If you want to take selfies or portrait photos of other people, you should keep the smartphone slightly higher when you take the pictures, so that the subject looks a bit upwards when you take the photo. This avoids the annoying double-chin effect and unwanted contours. Of course, there are other positions where your best side comes to the fore. If you look up, you stretch your neck and face and everything comes out a bit smoother and firmer without image processing and beauty mode. But don’t go overboard with the photographing from above, otherwise the person looks like a dwarf.
 Selfies and portrait photos make a better impression when photographed from above. / © AndroidPIT
Smartphone photo tip: wait for the right time of day
Snapshots often don’t allow for the luxury of patient image composition. However, if you are planning a photo, you should consider when you take it, because morning and evening hours often offer much more interesting light conditions than noon-time.
Smartphone photo tip: play with the perspective
A photo does not always have to be straight on; we already have that perspective all day long. Try a different angle, put yourself on a hill and photograph downward, or go down on your knees for a shot. This often creates more interesting pictures – except for the hated double-chin. So be careful with shots from below.
 For this picture, a position was chosen close to the ground, which makes it more dramatic and more powerful. Increasing color saturation does the rest. / © AndroidPIT
Smartphone photo tip: panorama
If you don’t want to photograph human beings, but nature and landscapes instead, the panorama mode is offered. Above all, very large subjects, such as a mountain chain or a sunset at sea, sometimes need more space than is available on a single photo. Pretty much every current smartphone has a corresponding mode that takes care of snapping and collecting multiple images and cleanly joining them together for you. If your smartphone is a bit older, an application from Google Play with the proper function can also be helpful. Panorama pictures are also suitable for a cover image on Facebook, even if the whole picture cannot fit in the frame; the most attractive part of your profile can be emphasized even more.
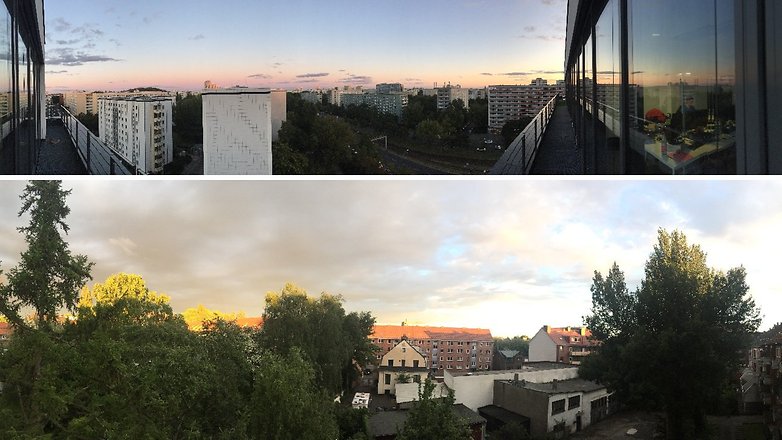 If you want to photograph a broad setting, you should use the panorama mode. / © AndroidPIT
Smartphone photo tip: observe the lighting
Light can be your friend and your enemy, depending on your environment and what you want to capture. Frontal exposure to the sun is often a real problem, unless you intentionally overexpose the image and play with the contrast in post-processing. If possible, stand with your back to the light and avoid strong shadows from the front. If the frontal light source is sometimes unavoidable, add the flash, which sometimes helps.
Smartphone photo tip: use the flash only in an emergency
If a strong exposure is not absolutely essential for the image, one should refrain from using the flash, because it seldom produces really beautiful images. Not only does the quality of the colors suffer, the uniform illumination often completely destroys the image. The foreground shines bright white, while the background completely disappears. In the end, a photo with natural light and more picture noise is often more pleasant and handsome than one hit by lightning.
 Natural light is the best light for photos. Avoid flash shots like this picture, when you can. / © AndroidPIT
Smartphone photo tip: LED flash
The LED flash of the smartphone camera is to provide your snapshots with the appropriate exposure if the appropriate light is missing. But the result with smartphones is usually very disappointing and the subject seems unnaturally overexposed. The background also suffers from the bright light of the flash, which brings the subject to the foreground, but casts shadows on the remaining details. A photo flash often leads to hard shadows, which robs the image of its naturalness. As a countermeasure, you can use a semi-translucent white tape that sticks over the flash of your smartphone. That gives you a homemade diffuser that slightly reduces the hardness of the lightning and provides for smooth light and shadow transitions. This makes the photo more natural and beautiful. Especially at parties with a little subdued lighting, the homemade diffuser can work wonders.
 From left to right: without LED flash, with LED flash (without diffuser), with LED flash (with diffuser). / © AndroidPIT
Smartphone photo tip: zoom in with your feet
The digital zoom on the smartphone may save you a few steps, but it ruins the picture. This is still a big deficit of smartphone cameras compared against counterparts with optical zoom, as well as compact and SLR cameras. Since the zoom lens is missing, the image section is just digitally enlarged, which drastically reduces the detail resolution. So do yourself a favor and get a few steps closer.
 This 100-percent view clearly shows the difference between optical (left) and digital zoom (center and right): while in the Sony Cybershot QX10 (left) details are at least recognizable, the Xperia Z1 (middle) and even the LG G2 (right) do not deliver more than pixel scrap. / © AndroidPIT
Smartphone photo tip: love shadows as much as the sun
The HDR mode is increasingly used in smartphones to compensate for strong light discrepancies in the picture. First, it has its limits, and second, it often doesn’t need to be used if you simply put yourself in the shade and photograph outside of it. Direct light can affect the image greatly, so bright sunshine does not always ensure radiant images.
 Above with HDR, below without: the difference is recognizable. / © AndroidPIT
Smartphone photo tip: effective post-processing
Now we leave the field of photography. Once the pictures are taken, there’s a next step: sharing them. Before you do this, however, you can still improve the photos – be it to correct the colors, to choose the right cut, or to add more drama with filters. For this, you should install the appropriate image editing app:
The best photo editing apps for Android
Smartphone photo tip: take sunset photos
Sunsets look great in person, but often when you try to capture the moment with a smartphone, the results are underwhelming. Smartphones have small image sensors with a low dynamic range, which means they can't capture both the light and dark areas of the image well at the same time. That leaves photos both underexposed and overexposed. This problem can be defeated if your camera has an HDR mode. HDR stands for High Dynamic Range, and it takes several shots with different exposures at once, combining them all together for an extended dynamic range. This results in the desired effect of accurate lighting, color and more details. The sunset will look as it's supposed to, rather than simultaneously under and overexposed.
 There's too much light in the standard shot, but you can see the color and details in the HDR shot. / © AndroidPIT
Smartphone photo tip: take great party photos
At parties, the environment is often quite dark and the subjects of your photo will likely be moving around a lot. To avoid poor results, there are a few things you can do. In bars and dimly lit rooms, you'll be well-served by using the flash. Try to take photos where the background is lit so the photos don't turn out boring and dark. Since people will be having fun and moving around, the best thing to do is take multiple shots so at least one won't be ruined by blur.
How to take photos at night with your smartphone
 With the flash only affecting the foreground, the background can look a bit drab. / © AndroidPIT
Get to grips with your bokeh mode with these tips
Bokeh is everywhere these days. Almost every top smartphone has an integrated bokeh mode in its camera app at the moment and Apple is going big on the feature with its 2018 iPhones. Bokeh is an effect that puts your primary object in sharp focus whilst blurring the background to make it much softer than your subject. It essentially mimics the image effects of an SLR camera, and when you get it right, the results can be impressive. Here's how to do it right.
Find the bokeh mode in your camera app and activate it. On some devices, it's a small circular icon.
Get the distance right between your subject and object by moving the camera.
Set your preferred level of aperture (if available). This will determine how blurred your background is compared to the subject.
Be careful of glasses or windows, which can upset the effect.
Try to shoot in front of a textual background, a plain white wall will look the same blurred or sharp.
Shoot! On the new iPhones, you can even adjust the depth of field after you have taken a shot - pretty cool!
 In the image on the right, the large windows have messed up the bokeh effect. / © AndroidPIT
Do you have any good photo taking tips you could share with us? Did our tips help you? Let us know in the comments below?
Originally published at https://www.androidpit.com by HANS-GEORG KLUGE

No comments:
Post a Comment